1. Preliminaries
Sections of the tutorial will continuously be published at this web page.
1.1. Git and GitHub
1.1.1. Installing Git
Install the Git version control system (VCS) from https://git-scm.com/downloads.
1.1.2. Logging in to GitHub
-
Create an account on https://github.com/.
-
Verify your e-mail, then log in using your credentials.
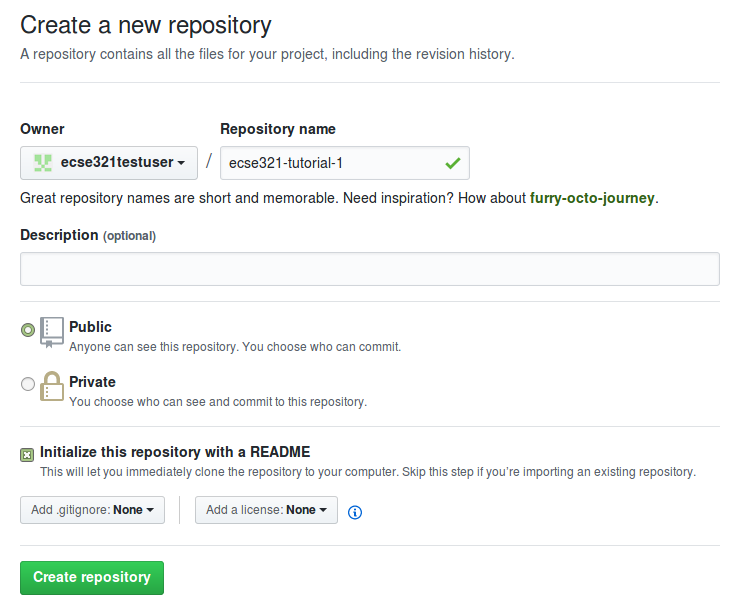
1.1.3. Creating a repository on GitHub
-
Visit https://github.com/ then click on New repository (green buttom on the right).
-
Set your user as the owner of the repository.
-
Give a name for the repository (e.g., ecse321-tutorial-1), leave it public, then check Initialize this repository with a README. Click on Create repository afterwards. At this point the remote repository is ready to use.
1.1.4. Cloning to a local repository
-
Open up a terminal (Git bash on Windows).
-
Navigate to the designated target directory (it is typical to use the
gitfolder within the home directory for storing Git repositories, e.g.,cd /home/username/git). -
Using a Git client, clone this repository to your local Git repository. First, get the repository URL (use HTTPS for now).
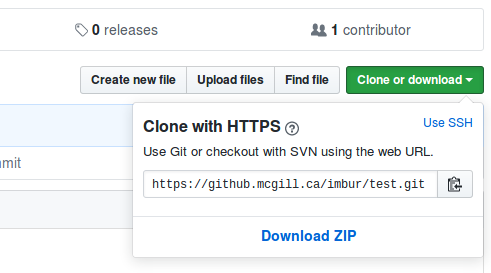
Then, issuegit clone https://url/of/the/repository.git
You should get an output similar to this:
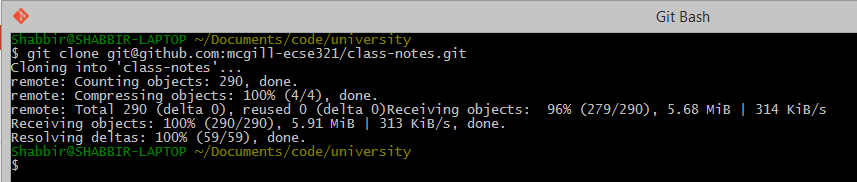
-
Verify the contents of the working copy of the repository by
ls -la ./repo-name. The .git folder holds version information and history for the repository.
1.1.5. Git basics
-
Open up a terminal and configure username and email address. These are needed to identify the author of the different changes.


Glossary — Part 1:-
Git is your version control software
-
GitHub hosts your repositories
-
A repository is a collection of files and their history
-
A commit is a saved state of the repository
-
-
Enter the working directory, then check the history by issuing
git log. Example output:
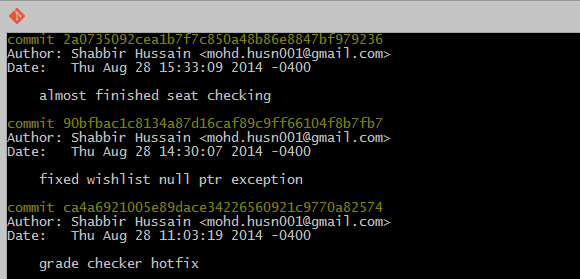
-
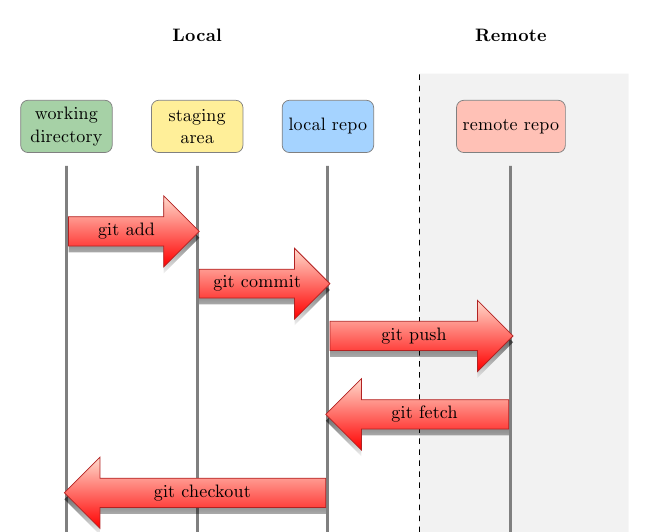
Adding and commiting a file: use the
git addandgit commitcommands.


The effect of these commands are explained on the figure below:
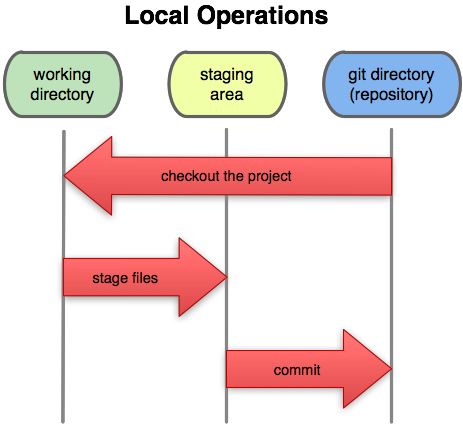
Glossary — Part 2:-
Working Directory: files being worked on right now
-
Staging area: files ready to be committed
-
Repository: A collection of commits
-
-
Checking current status is done with
git status.
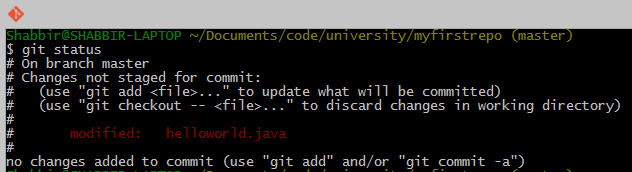
-
Staging and unstaging files: use
git resetto remove files from the staging area.

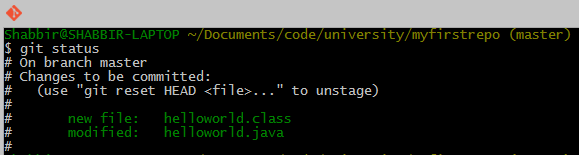
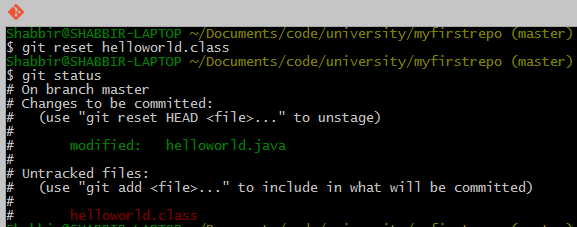
Important: only staged files will be commited.
-
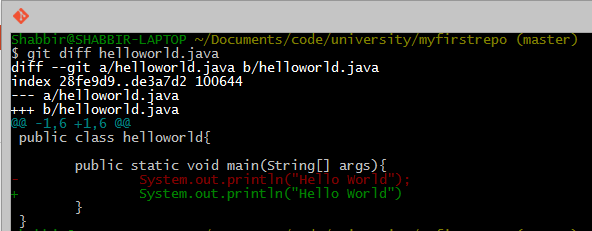
To display detailed changes in unstaged files use
git diff, while usegit diff --stagedto show changes within files staged for commit.

-
Reverting to a previous version is done using
git checkout.

-
The commands
git pull(or thegit fetch+git rebasecombination) andgit pushare used to synchronize local and remote repositories.
1.1.6. Browsing commit history on GitHub
-
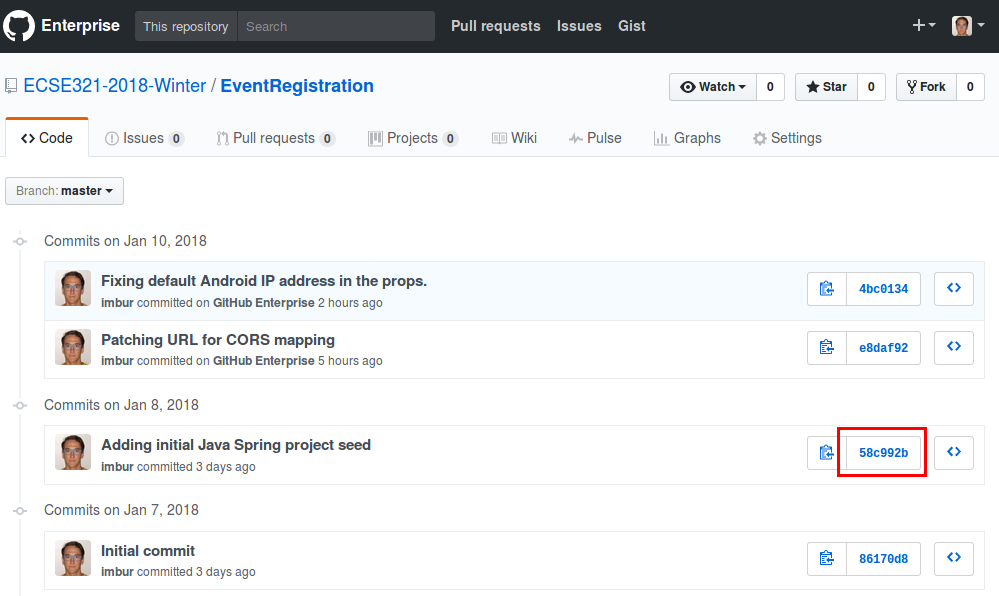
You can browse pushed commits in the remote repository online using GitHub. You can select the commits menu for a repository.
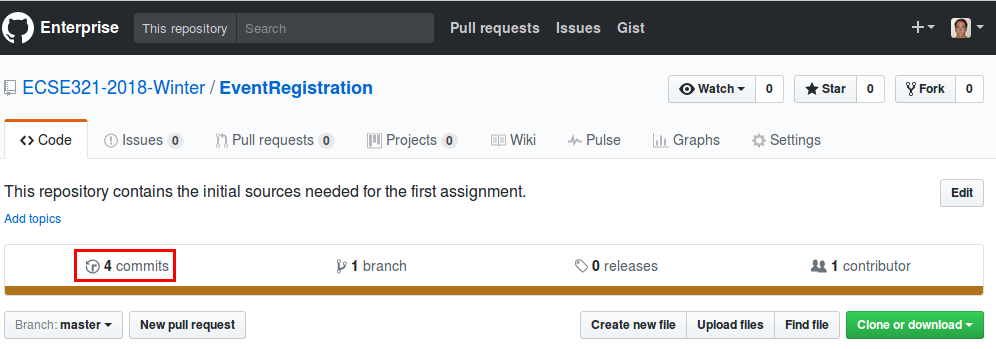
To get a link for a specific commit, click on the button with the first few characters of the hash of the commit.
1.1.7. Linux commands cheat sheet:
-
cd: change/navigate directory -
ls: list contents of a directory -
ls -la: list all contents of a directory in long listing format -
touch: create a file -
cp: copy a file -
mv: move a file -
rm: remove a file -
mkdir: create a directory -
cp -r: copy a directory recursively with its contents -
rmdir: remove a directory -
rm -rf: force to recursively delete a directory (or file) and all its contents -
cat: concatenate and print contents of files -
nano: an easy-to-use text editor
The source for most of the images in the Git documentation: https://github.com/shabbir-hussain/ecse321tutorials/blob/master/01-githubTutorial1.pptx
1.2. Travis CI
-
Go to https://travis-ci.com/, click on Sign up with GitHub.
-
Click on the green authorize button at the bottom of the page.
-
Activate Travis-CI on your GitHub account
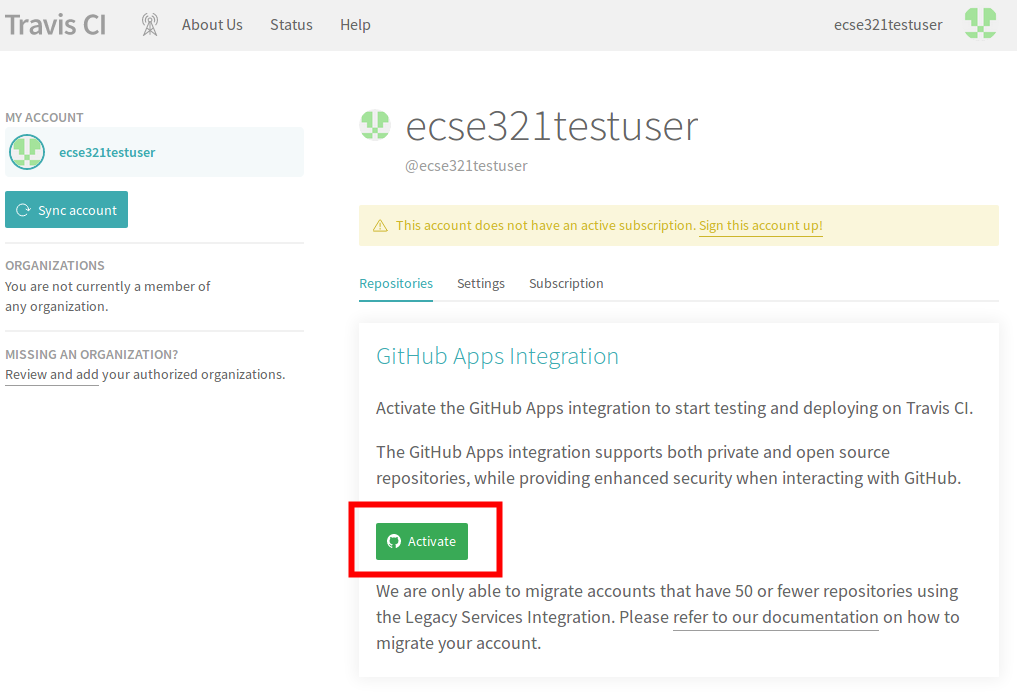
-
Select the repositories you want to build with Travis (make sure to include your repository that you created for this tutorial). You can modify this setting anytime later as well.
-
In your working copy of your repository, create a small Maven project with Spring Boot.
-
Make sure you have Maven 3 installed (
mvn --version). -
Create the
src/main/java/Main.javafile with the contentimport org.springframework.boot.autoconfigure.EnableAutoConfiguration; import org.springframework.boot.SpringApplication; import org.springframework.context.annotation.Configuration; import org.springframework.web.bind.annotation.RestController; import org.springframework.web.bind.annotation.RequestMapping; @Configuration @EnableAutoConfiguration @RestController public class Main { public static void main(String[] args) { SpringApplication.run(Main.class, args); } @RequestMapping("/") public String greeting(){ return "Hello world!"; } } -
Create a
pom.xmlin the root of the working copy.<?xml version="1.0" encoding="UTF-8"?> <project xmlns:xsi="http://www.w3.org/2001/XMLSchema-instance" xmlns="http://maven.apache.org/POM/4.0.0" xsi:schemaLocation="http://maven.apache.org/POM/4.0.0 http://maven.apache.org/maven-v4_0_0.xsd"> <modelVersion>4.0.0</modelVersion> <groupId>ca.mcgill.ecse321</groupId> <artifactId>tutorial1</artifactId> <version>1.0</version> <parent> <groupId>org.springframework.boot</groupId> <artifactId>spring-boot-starter-parent</artifactId> <version>2.0.4.RELEASE</version> <relativePath/> </parent> <name>tutorial1</name> <properties> <java.version>1.8</java.version> </properties> <dependencies> <dependency> <groupId>org.springframework.boot</groupId> <artifactId>spring-boot-starter-web</artifactId> </dependency> </dependencies> <build> <plugins> <plugin> <groupId>org.springframework.boot</groupId> <artifactId>spring-boot-maven-plugin</artifactId> <executions> <execution> <goals> <goal>build-info</goal> </goals> <configuration> <additionalProperties> <java.source>${maven.compiler.source}</java.source> <java.target>${maven.compiler.target}</java.target> </additionalProperties> </configuration> </execution> </executions> </plugin> </plugins> </build> </project> -
Add a
.gitignoreto ignore generated resources by Git:*.class target/ -
Make sure your application is compiling by running
mvn clean install
-
-
Create a file called
.travis.yml:language: java script: - mvn clean install -
Commit and push your work. If everything is set up correctly, the build should trigger and Travis should run your build using Maven.
1.3. Heroku
-
Sign up for a Heroku account under https://www.heroku.com/.
-
Install the command line client for Heroku: Heroku CLI
-
The Travis client might also be useful at later stages of the course, you can install it from here: Travis CLI
-
-
Log in to Heroku:
heroku login. -
In the root of your working directory, issue
heroku create. -
Deploy your application with
git push heroku. -
Visit the application under the link provided in the command’s output.
2. Backend
2.1. Description of Event Registration System
We assume that the following description is elicited from stakeholders (e.g., potential customers):
-
The Event Registration System shall provide the ability to add a participant by specifying the participant’s name. This feature should be available in both a Web browser and an Android application.
-
The Event Registration System shall provide the ability to add an event by specifying the event’s name, date, start time, and end time. This feature should be available in both a Web browser and an Android application.
-
The Event Registration System shall provide the ability to register a participant to an event. This feature should be available in both a Web browser and an Android application.
-
The Event Registration System shall list all events in a Web browser.
-
The Event Registration System shall list all participants in a Web browser.
-
The Event Registration System shall list all events next to the participant who is registered to it in a Web browser.
The target Event Registration System consists of three main components:
-
Backend: It provides the core business functionality exposed as RESTful services by using the Java Spring Framework. In addition, it connects to a database to store business data.
-
Web frontend: The web frontend needs to be developed in Vue.js, a popular framework using HTML5 and JavaScript for reactive user interfaces. The web frontend is connected to the backend via HTTP calls using the Rest API.
-
Android frontend: The same backend services will also be accessed using an Android frontend application. Similarly, the Android frontend issues HTTP calls to call the backend.
2.2. Java Spring-based Backend
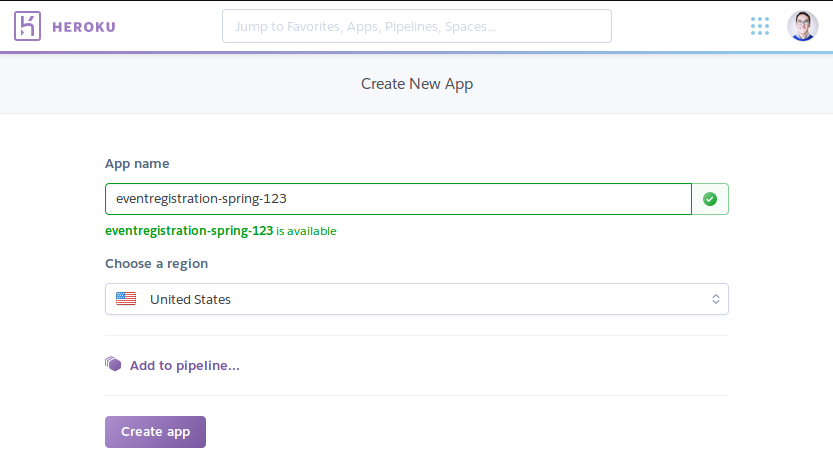
2.2.1. Create a new Heroku application with a database
-
Go to https://dashboard.heroku.com/apps and click on New, then Create new app.
-
Name it eventregistration-backend-
{some unique ID}.
-
On the next page, go to Resources, then add the Heroku Postgres add-on.
 Note
NoteWe are using Postgres instead of MySQL database because the currently available MySQL providers require payment setup even for free plans. -
Click the entry for Postgres within the list of add-ons, then go to Settings. You can see the database credentials there.
NoteThe credentials are periodically updated and changed by Heroku, so make sure that you are using the actual credentials when manually connecting to the database. (E.g., during manual testing.)
2.2.2. Preparing the base Spring project
-
Install the Spring Boot CLI following the steps described under https://docs.spring.io/spring-boot/docs/current/reference/html/getting-started-installing-spring-boot.html#getting-started-installing-the-cli
-
Create a project for the backend application using Spring Boot CLI somwhere on your disk. Make sure you are creating it in a location that is not part of any git repository!
spring init \ --build=gradle \ --java-version=1.8 \ --package=ca.mcgill.ecse321.eventregistration \ --name=Eventregistration \ --dependencies=web,data-jpa,postgresql \ EventRegistration-backend -
Locate the Java file containing the main application class (
EventregistrationApplication.java) and add the following contentpackage ca.mcgill.ecse321.eventregistration; import org.springframework.boot.autoconfigure.SpringBootApplication; import org.springframework.boot.SpringApplication; import org.springframework.web.bind.annotation.RestController; import org.springframework.web.bind.annotation.RequestMapping; @RestController @SpringBootApplication public class EventregistrationApplication { public static void main(String[] args) { SpringApplication.run(EventregistrationApplication.class, args); } @RequestMapping("/") public String greeting(){ return "Hello world!"; } } -
Verify that it builds with
gradle build -xtest.NoteMake sure you have Gradle installed. If not, install it from https://gradle.org/install/. -
Create a git repository and commit the project.
git init .
git add .
git commit -m "Initial commit of the backend application"
-
On the application’s Settings page copy the Heroku Git URL.
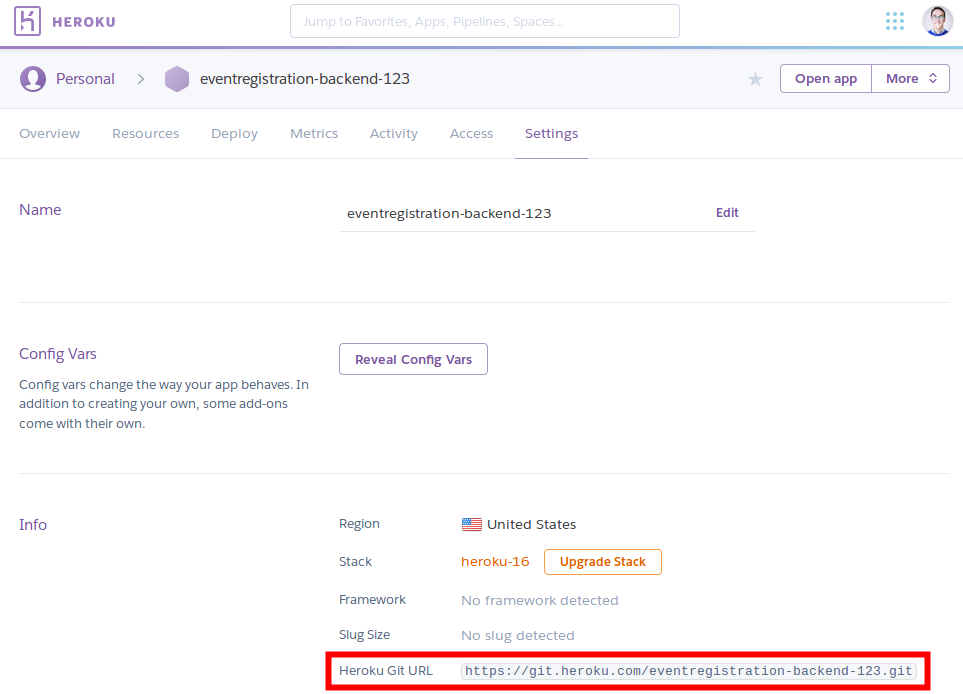
-
Add the
herokuremote and deploy the first version of the application with
git remote add heroku https://git.heroku.com/eventregistration-backend-123.git
git push heroku
-
If it fails to build, ensure on Heroku’s webpage you have the Gradle Buildpack added to your application under Settings

2.2.3. Eclipse configuration
-
Go to https://www.eclipse.org/downloads/packages/release/oxygen/3a and download Eclipse Modeling Tools
NoteCurrently, the UML Lab plugins seem to be incompatible with the latest release of Eclipse (Photon), so we are using the previous release (Oxygen). -
Navigate to http://update.yatta.de/uml-lab/ and install UML Lab (use the drag&drop icon).
-
Restart Eclipse, then enter the UML Lab license when prompted after restart.
 Note
NoteYou can find the academic license in the MyCourses Announcement "Activating UML Lab". -
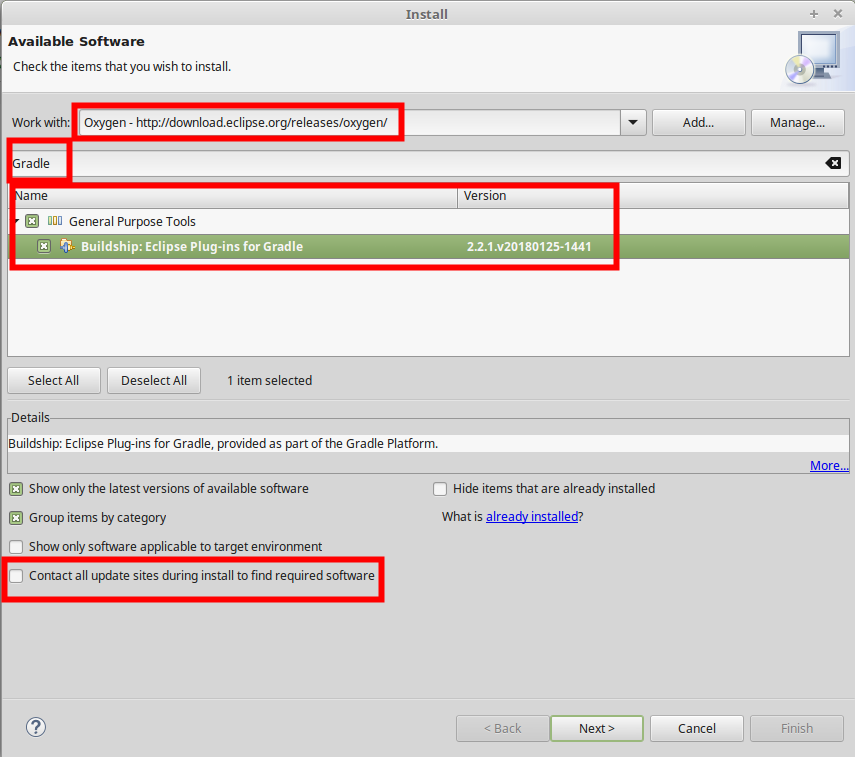
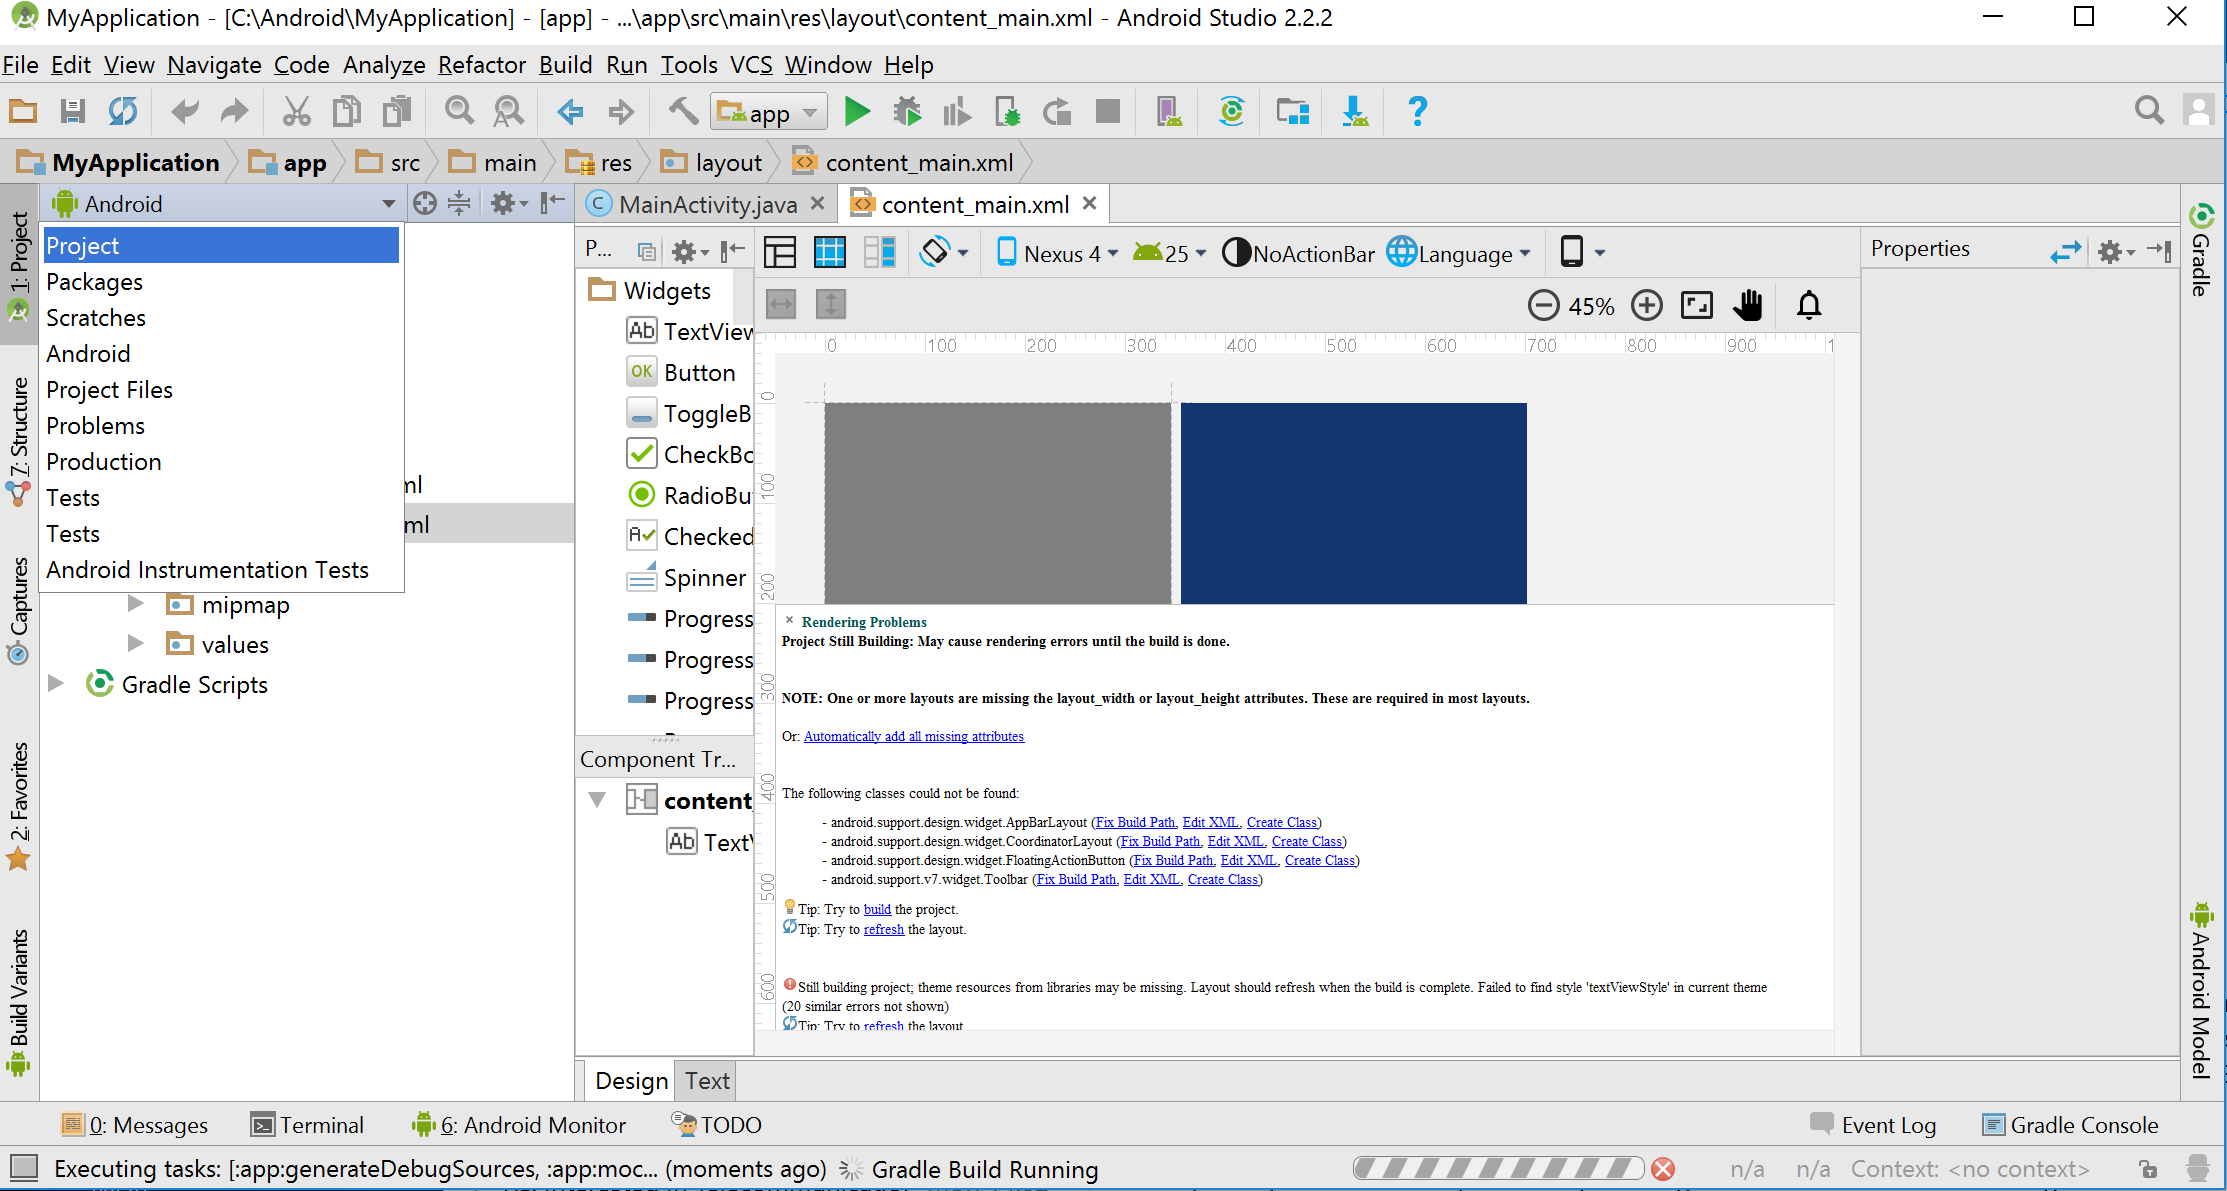
Install Buildship Eclipse Plug-ins for Gradle from the menu Help > Install New Software…. Select the Oxygen http://download.eclipse.org/releases/oxygen/ update site, and fill out the page as shown below.
-
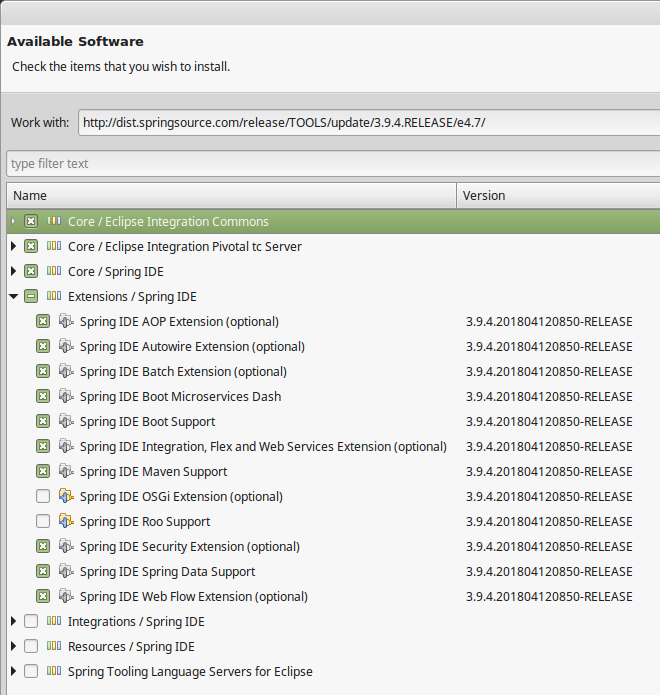
Get the Spring tools from the update site http://dist.springsource.com/release/TOOLS/update/3.9.4.RELEASE/e4.7/. Open Help > Install new software… and insert the URL and select components as shown below.
2.2.4. Running the Backend Application from Eclipse
-
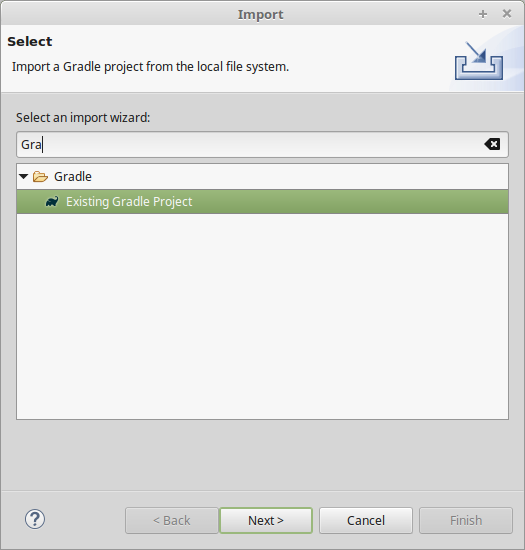
Import the EventRegistration-backend Spring Boot project as a Gradle project from File > Import… > Gradle > Existing Gradle project using the default settings. Select the previously generated Spring project folder as the root of the project.
-
Find the
EventregistrationApplication.javasource file, then right click and select Run As > Spring Boot App. The application will fail to start, since the database is not yet configured, but this action will create an initial run configuration. -
Open a terminal, and from the root of your git repository obtain the URL to access the database remotely:
heroku run echo \$JDBC_DATABASE_URL. -
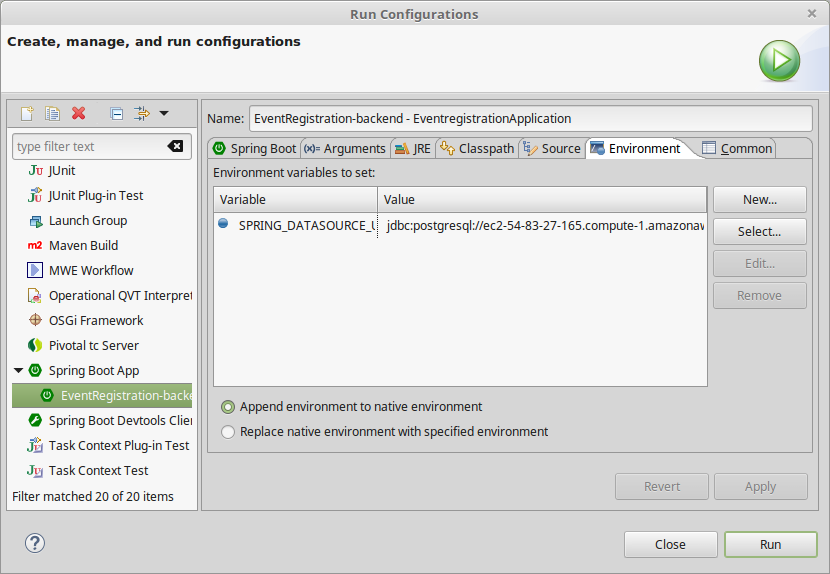
In Eclipse, open the EventRegistration-backend - EventregistrationApplication run configuration page and add an environment variable called
SPRING_DATASOURCE_URLwith the value obtained in the previous step.
-
Add
spring.jpa.properties.hibernate.jdbc.lob.non_contextual_creation=trueto yourapplication.properties. It is a workaround for an issue with Postgres. -
Add the
spring.jpa.hibernate.ddl-auto=create-droptoapplication.propertiesas well. The database tables will be recreated each time your application starts.ImportantIn production, the value of this property should be validate(instead ofcreate-drop).
2.2.5. Domain modeling with UML Lab
-
In the upper right corner in Eclipse, change to UML Lab perspective.
-
Create a new folder named
modelin the project, then right click, select New… > UML Model and Class Diagram. Create an empty model and diagram (leave everything on default). -
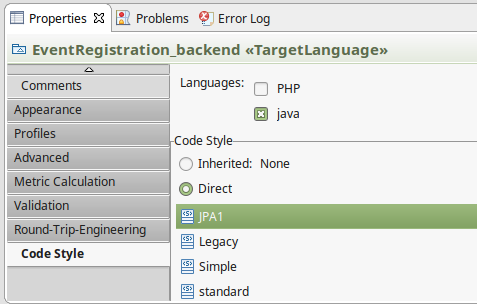
Open the class diagram, then in the Properties view, select the Direct > JPA1 code style.
-
In the same Properties view make sure that the following profiles are applied.
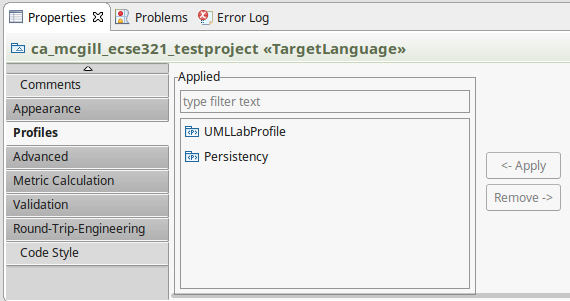
-
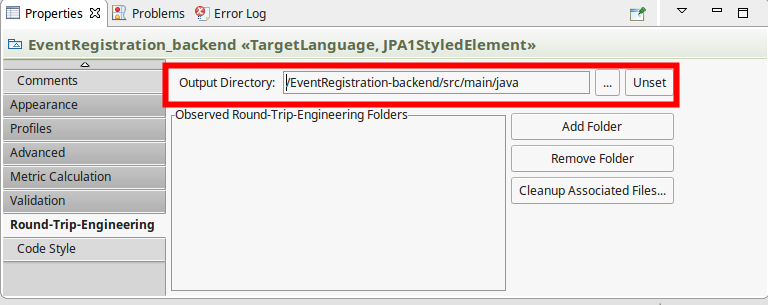
Additionally, set the output folder.
-
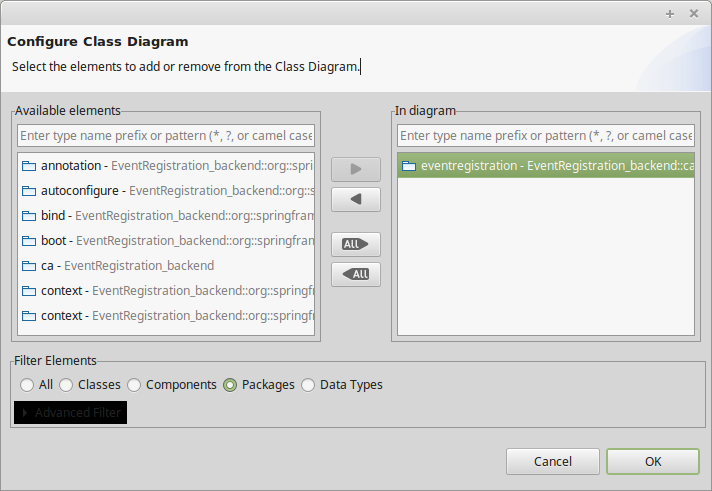
Right click on the diagram, then select Configure Class Diagram. Add the
eventregistrationpackage.
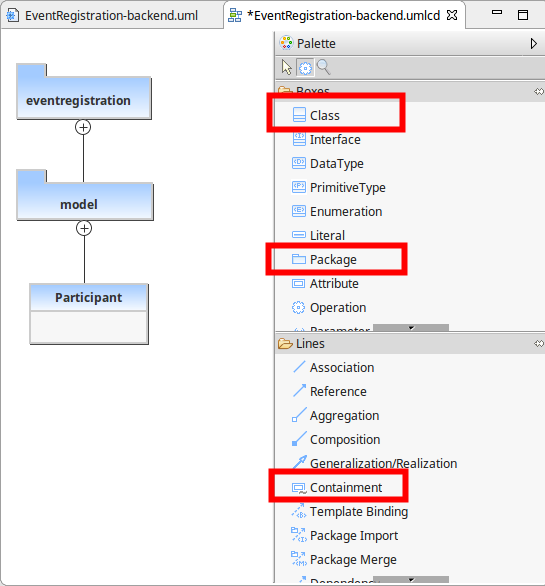
-
Using the Palette on the left hand side of the class diagram editor, create the following package and class, and connect them with the Containment line.
-
After right click on the diagram, select Generate code. Study what is generated in the
ca.mcgill.ecse321.eventregistration.modelfolder. -
Extend the diagram by adding more classes and association and composition relations as shown below.
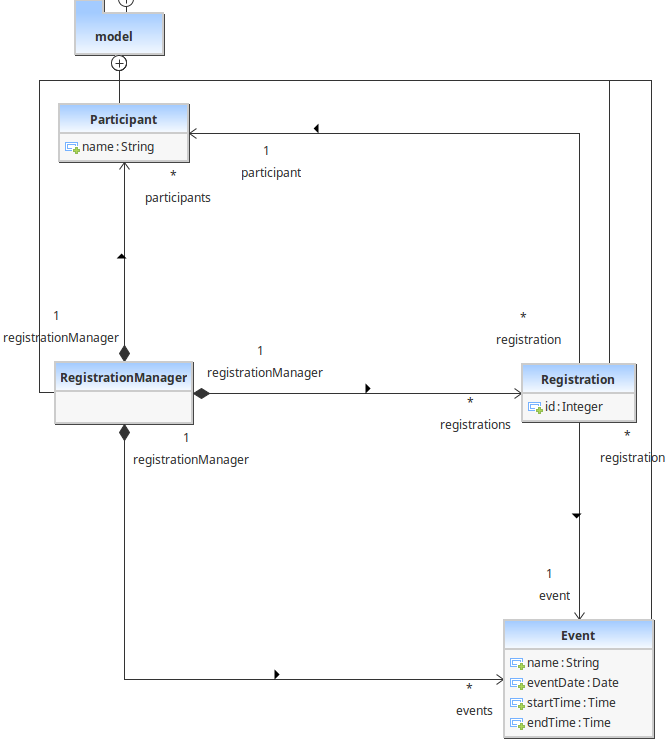
-
To add types for an attribute, click on the attribute name in the diagram, then set the type as below.
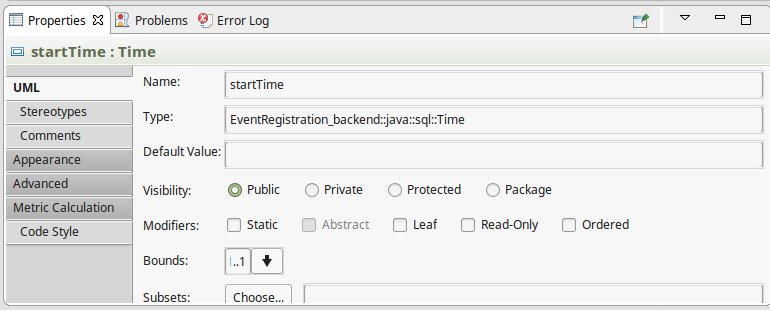
-
Regenerate the code. Note that dependencies are automatically managed by gradle, so that we don’t need to add jars manually as dependencies.
-
Open the generated classes, then manually assign IDs to the entities bu supplying the
@Idannotation from thejavax.persistencepackage. (Participant: name,Event: name,Registration:id)ImportantPlace the annontation over the getter methods, and not over the field. -
Manually add an ID field for the
RegistrationManager. Observe how the changes to the code are synchronized to the diagram.//... @Entity public class RegistrationManager{ private Integer id; public void setId(Integer value) { this.id = value; } @Id public Integer getId() { return this.id; } //... } -
In the
Eventclass remove any@OneToOneannotations from getters associated with date and time.
2.2.6. Spring Transactions
-
Update the
EventregistrationApplicationclass as follows:package ca.mcgill.ecse321.eventregistration; import org.springframework.boot.SpringApplication; import org.springframework.boot.autoconfigure.SpringBootApplication; @SpringBootApplication public class EventregistrationApplication { public static void main(String[] args) { SpringApplication.run(EventregistrationApplication.class, args); } } -
Create the
EventRegistrationRepositoryclasspackage ca.mcgill.ecse321.eventregistration.repository; import javax.persistence.EntityManager; import org.springframework.beans.factory.annotation.Autowired; import org.springframework.stereotype.Repository; import org.springframework.transaction.annotation.Transactional; import ca.mcgill.ecse321.eventregistration.model.Participant; @Repository public class EventRegistrationRepository { @Autowired EntityManager entityManager; @Transactional public Participant createParticipant(String name) { Participant participant = new Participant(); participant.setName(name); entityManager.persist(participant); return participant; } @Transactional public Participant getParticipant(String name) { Participant participant = entityManager.find(Participant.class, name); return participant; } } -
Create the
EventRegistrationControllerclass.package ca.mcgill.ecse321.eventregistration.controller; import org.springframework.beans.factory.annotation.Autowired; import org.springframework.web.bind.annotation.GetMapping; import org.springframework.web.bind.annotation.PathVariable; import org.springframework.web.bind.annotation.PostMapping; import org.springframework.web.bind.annotation.RequestMapping; import org.springframework.web.bind.annotation.RestController; import ca.mcgill.ecse321.eventregistration.model.Participant; import ca.mcgill.ecse321.eventregistration.repository.EventRegistrationRepository; @RestController public class EventRegistrationController { @Autowired EventRegistrationRepository repository; @RequestMapping("/") public String greeting() { return "Hello world!"; } @PostMapping("/participants/{name}") public String createParticipant(@PathVariable("name") String name) { Participant participant = repository.createParticipant(name); return participant.getName(); } @GetMapping("/participants/{name}") public String queryParticipant(@PathVariable("name") String name) { Participant participant = repository.getParticipant(name); if(participant == null) { return "NOT FOUND"; } return participant.getName(); } } -
Test the application using, e.g., the RESTClient browser plugin or
curl.
2.3. Testing Backend Services
We implement a first unit test for testing the application service logic.
2.3.1. Preparations
-
Open the project and ensure that you add JUnit 5 and Mockito 2+ to the project dependencies in
build.gradle:dependencies { // Add these lines to the dependency configuration, don't replace the existing dependencies testImplementation('org.junit.jupiter:junit-jupiter-api:5.3.1') testCompile('org.junit.jupiter:junit-jupiter-params:5.3.1') testRuntime('org.junit.jupiter:junit-jupiter-engine:5.3.1') testCompile('org.mockito:mockito-core:2.+') testCompile('org.mockito:mockito-junit-jupiter:2.18.3') }NoteFinding configuration settings for your Gradle/Maven project is very simple by searaching for them on MVNRepository: https://mvnrepository.com/ -
Enable Gradle to use the new JUnit5 platform in the
build.gradlefile by defining the test task:
test {
    useJUnitPlatform()
}
-
If you also would like to run your project from Eclipse, add an additional dependency:
testCompile group: 'org.junit.platform', name: 'junit-platform-launcher', version: "1.3.1" -
Create a test class (in case you don’t already have one)
EventregistrationApplicationTestsin the corresponding package undersrc/test/java:import org.junit.Test; import org.junit.runner.RunWith; import org.springframework.boot.test.context.SpringBootTest; import org.springframework.test.context.junit4.SpringRunner; @RunWith(SpringRunner.class) @SpringBootTest public class EventregistrationApplicationTests { @Test public void contextLoads() { } } -
Build your project to ensure its dependencies are correctly loaded.
2.3.2. Writing tests
-
Add the following imports to the test class:
import org.junit.jupiter.api.BeforeEach; import org.junit.jupiter.api.Test; import org.junit.jupiter.api.extension.ExtendWith; import org.junit.runner.RunWith; import org.mockito.InjectMocks; import org.mockito.Mock; import org.mockito.invocation.InvocationOnMock; import org.mockito.junit.jupiter.MockitoExtension; import org.springframework.boot.test.context.SpringBootTest; import org.springframework.test.context.junit4.SpringRunner; import ca.mcgill.ecse321.eventregistration.controller.EventRegistrationController; import ca.mcgill.ecse321.eventregistration.model.Participant; import ca.mcgill.ecse321.eventregistration.repository.EventRegistrationRepository; -
Add the following static imports for methods:
import static org.junit.Assert.assertEquals; import static org.mockito.ArgumentMatchers.anyString; import static org.mockito.Mockito.when; -
Create the DAO mock for participant
@Mock private EventRegistrationRepository participantDao; @InjectMocks private EventRegistrationController controller; private static final String PARTICIPANT_KEY = "TestParticipant"; private static final String NONEXISTING_KEY = "NotAParticipant"; @BeforeEach void setMockOutput() { when(participantDao.getParticipant(anyString())).thenAnswer( (InvocationOnMock invocation) -> { if(invocation.getArgument(0).equals(PARTICIPANT_KEY)) { Participant participant = new Participant(); participant.setName(PARTICIPANT_KEY); return participant; } else { return null; } }); } -
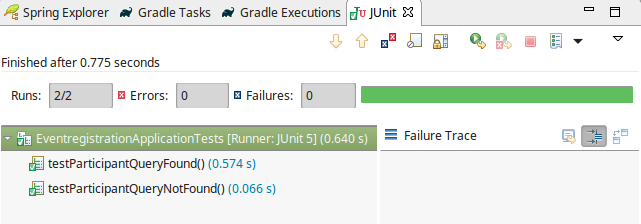
Add test cases
@Test public void testParticipantQueryFound() { assertEquals(controller.queryParticipant(PARTICIPANT_KEY), PARTICIPANT_KEY); } @Test public void testParticipantQueryNotFound() { assertEquals(controller.queryParticipant(NONEXISTING_KEY), EventRegistrationController.ERROR_NOT_FOUND_MESSAGE); } -
Run the tests with
gradle testfrom the command line in the root of the project, or in Eclipse, right click on the test class name then select Run As… > JUnit test.
3. Android Frontend
3.1. Create an Android project
-
Start a new Android project
-
Specify project details and click on Next
-
Application name: EventRegistration-Android
-
Company Domain:
ecse321.mcgill.ca -
Project location: create the project within the cloned git repository /home/student/git/HandsOnXX/EventRegistrationAndroid)
-
Package:
ca.mcgill.ecse321.eventregistration -
Click on Next
-
-
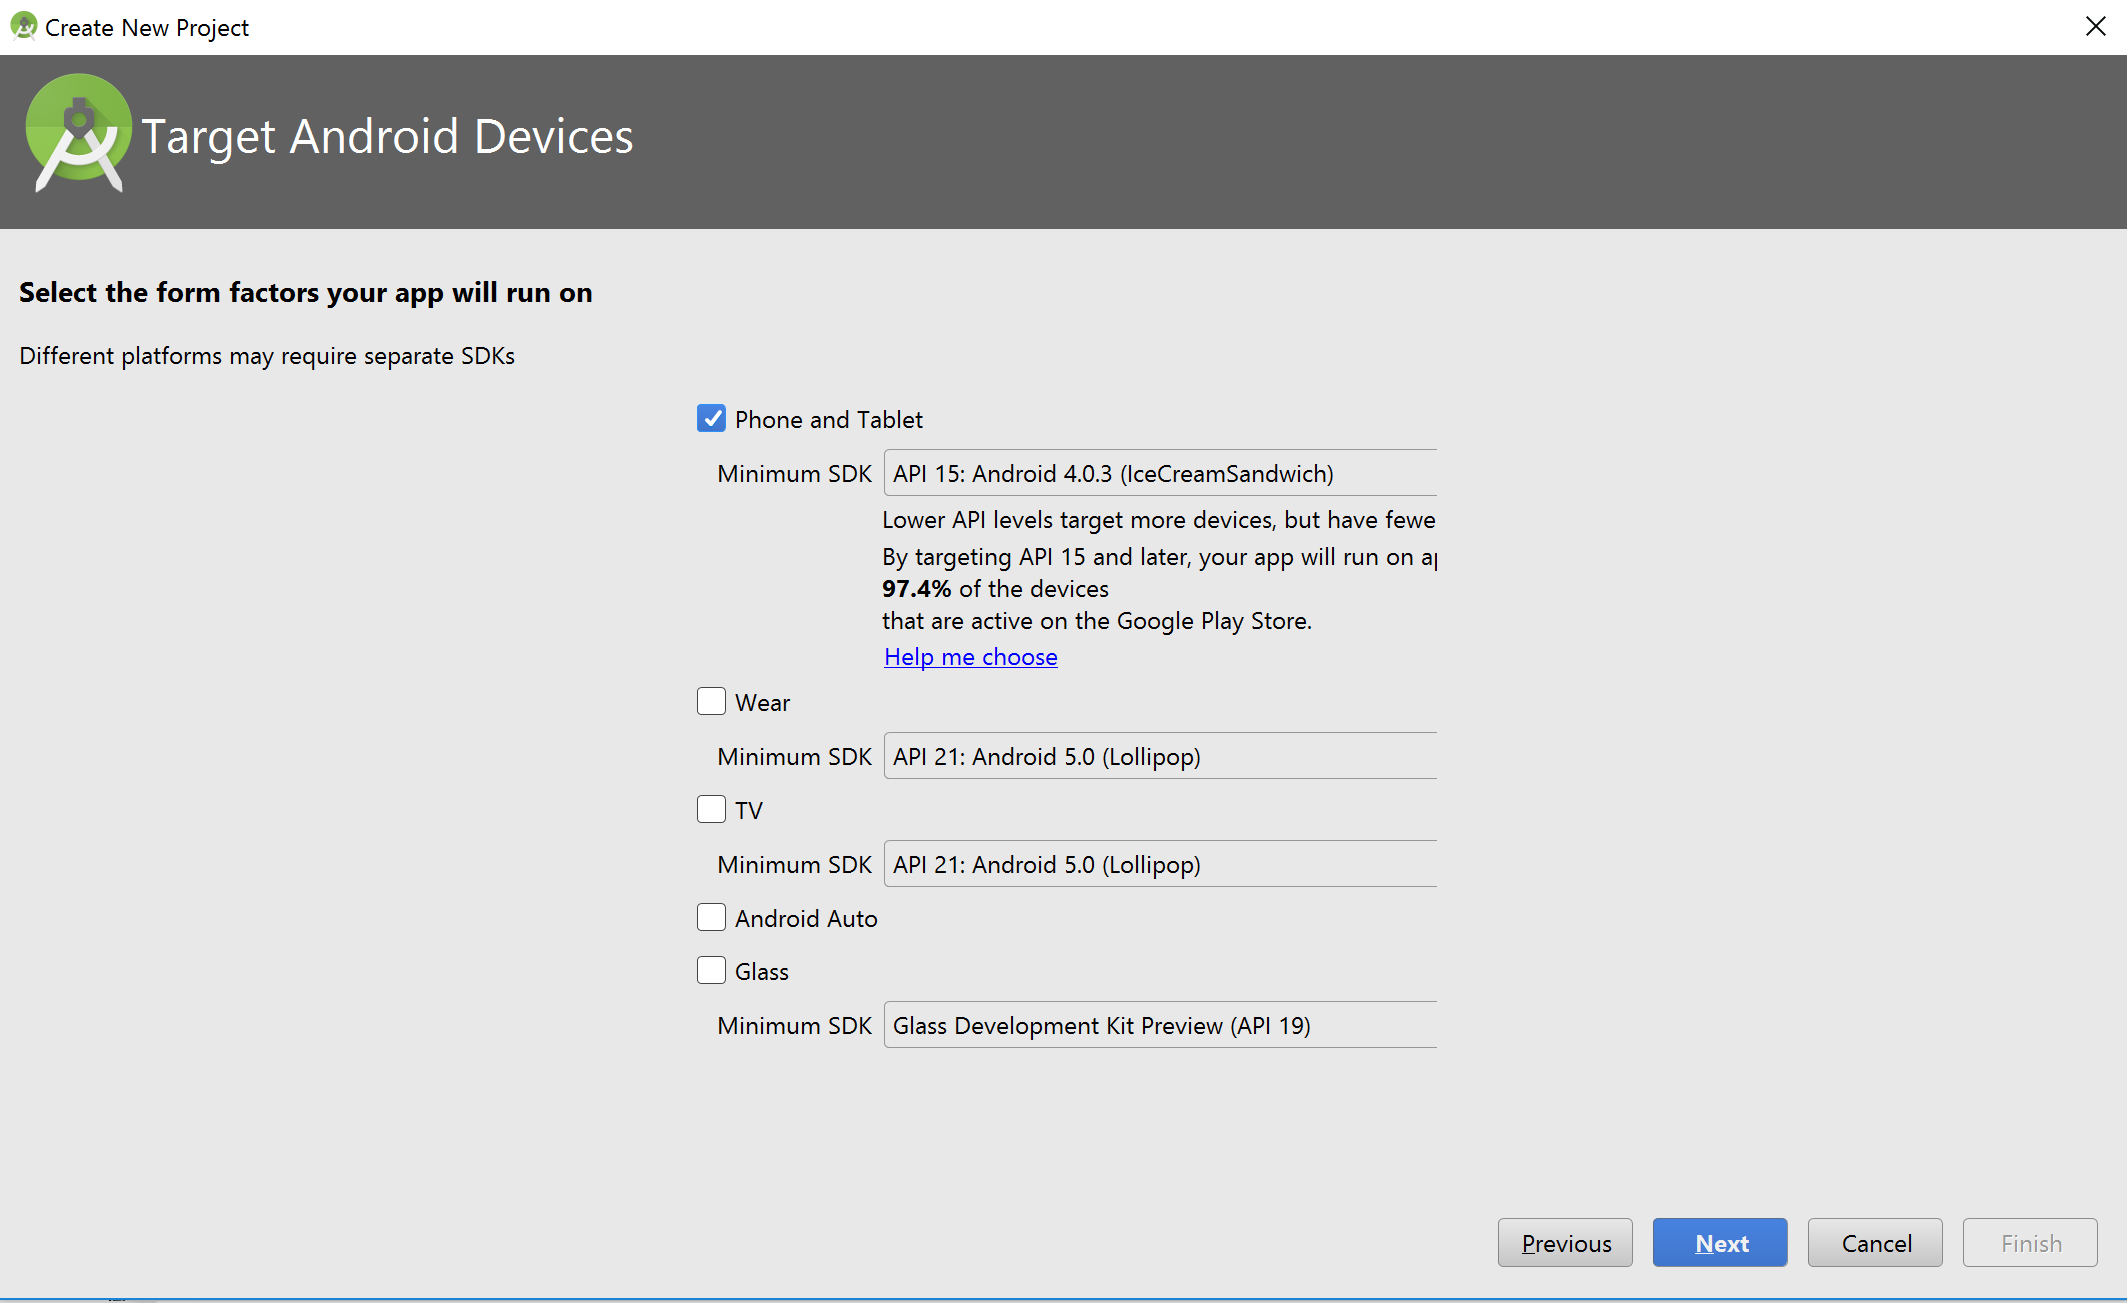
Leave the default settings for the target platform and click on Next
-
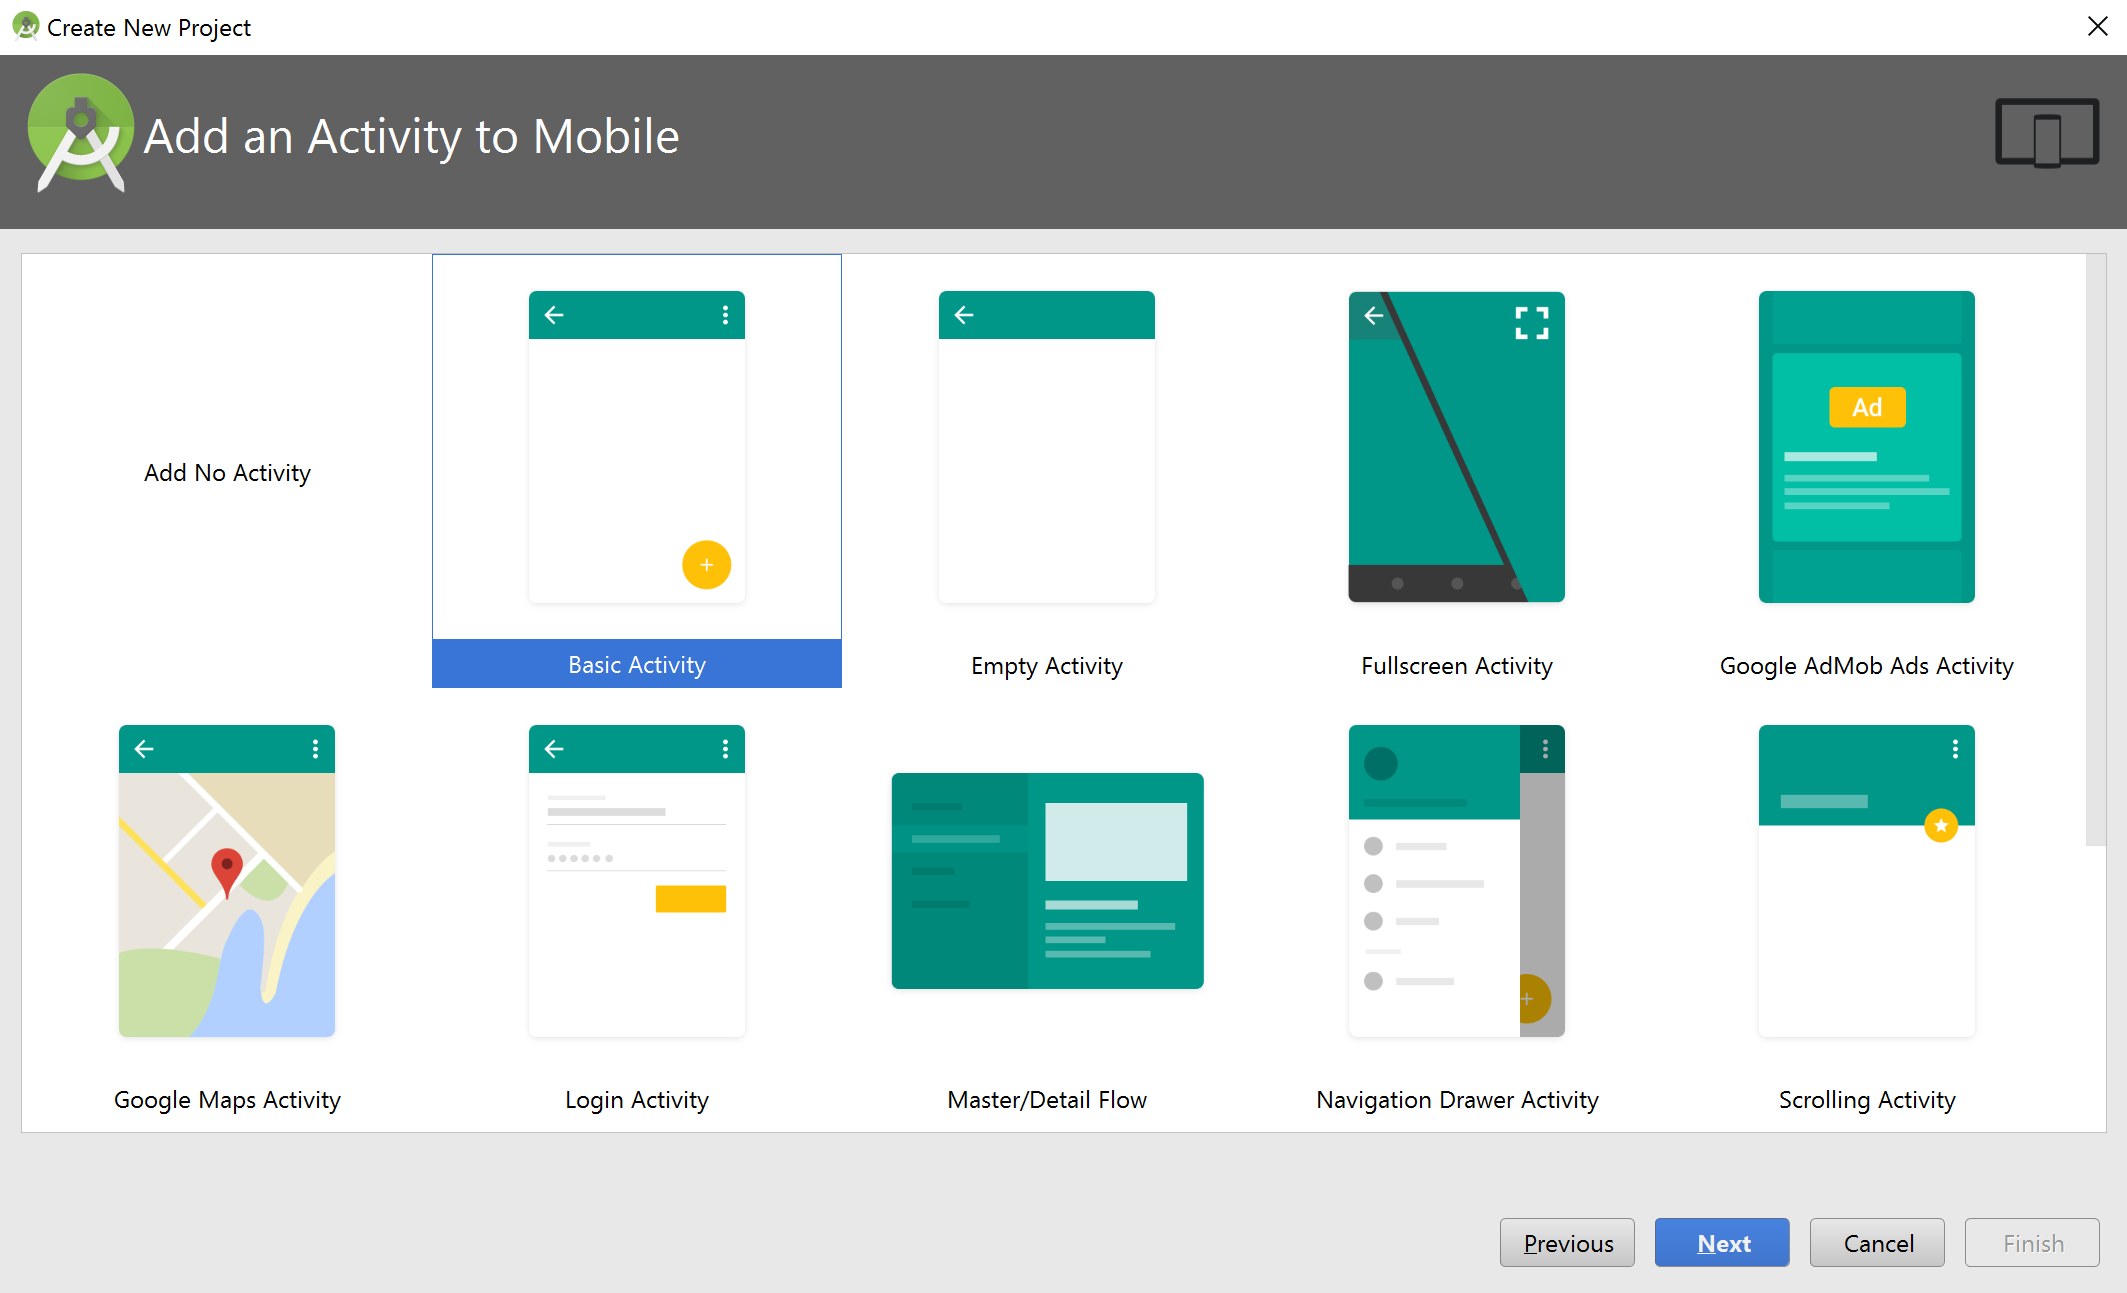
Select a Basic Activity and click Next
-
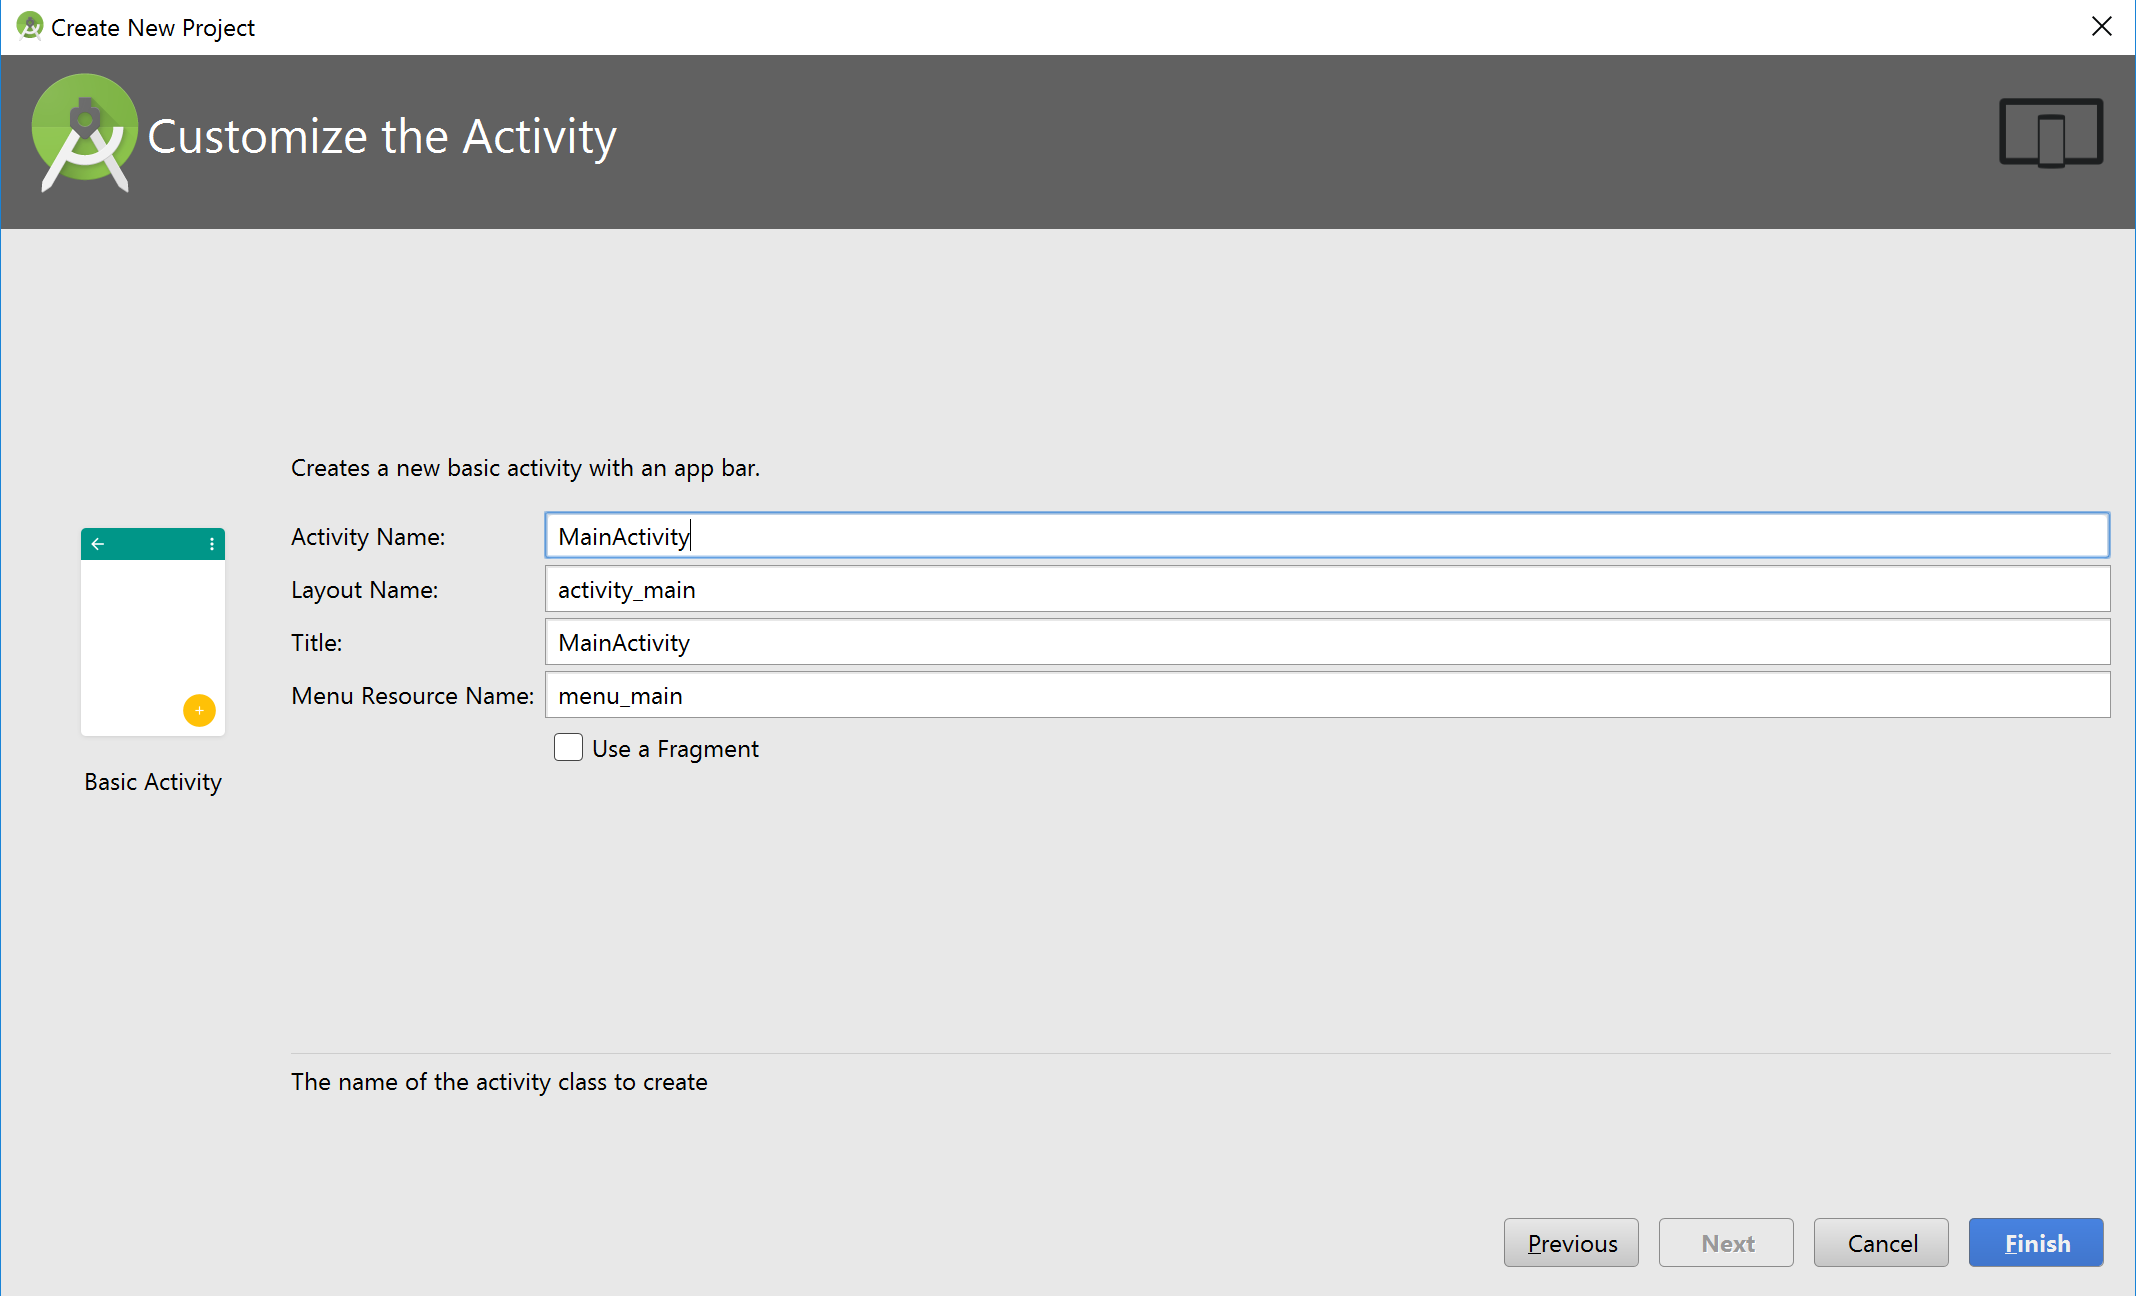
Leave activity defaults as they are (no further customization is needed) and click on Finish
-
Wait until the project is built by Gradle
-
Optional step.
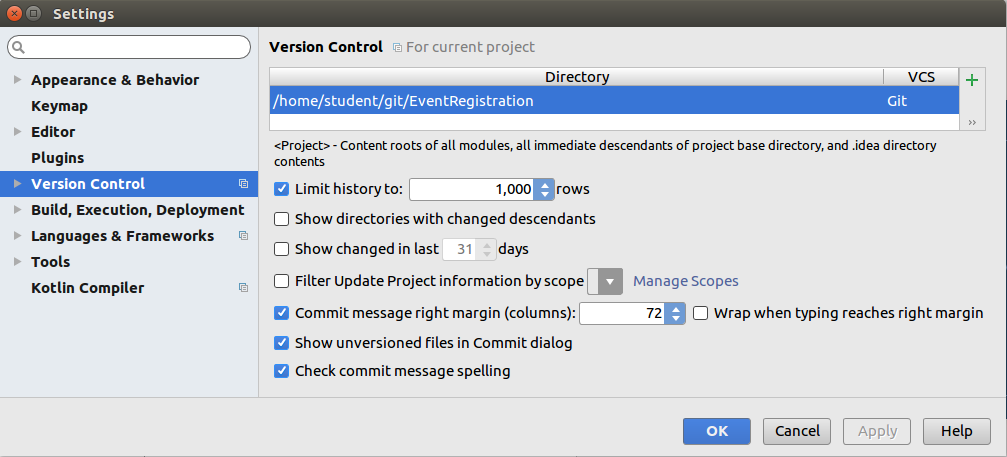
TipOptionally, to setup version control integration, go to File/Settings…/Version Control and add the repository as Git root to the project settings
Then, you can issue Git commands from the VCS menu in Android Studio while developing the application. Regardless whether you complete this step or not, you can still use git from the command line, since the project is created in the working directory of your git repository. -
Select the Project view in the left pane (instead of the default Android view) and observe three files:
-
MainActivity.java: application code is written here (located in app/src/main/java)
-
content_main.xml: layout specifications of the UI are provided in XML (located in app/src/main/res/layout)
-
strings.xml: naming of resources (located in app/src/main/res/values)
-
-
Include a dependency for network communication by adding the following line to the
build.gradlefile located in the app/src folder to the end within thedependencies{}part (see figure, but the content is different).implementation 'com.loopj.android:android-async-http:1.4.9'
-
Open the AndroidManifest.xml file (located in
app/src/mainwithin the Android project), and add the following XML tag for setting permissions appropriately (before the existing<application>tag)<?xml version="1.0" encoding="utf-8"?> <manifest xmlns:android="http://schemas.android.com/apk/res/android" package="ca.mcgill.ecse321.eventregistration"> <uses-permission android:name="android.permission.INTERNET"/> <!-- Existing content with <application> tag --> </manifest> -
As the gradle build file has changed, click on the Sync link.
-
Re-build the project by Build | Make Project if still needed.
3.2. Developing for Android: Part 1
3.2.1. Developing the View Layout
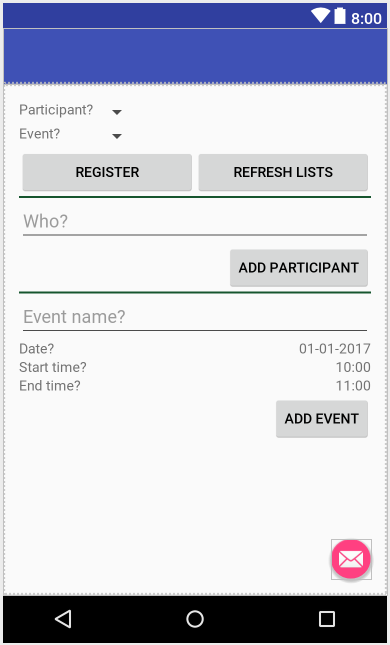
In the next steps, we will develop a simple GUI as the view for the mobile EventRegistration app with (1) one text field for specifying the name of a participant, and (2) one Add Participant button
The GUI will look like as depicted below.
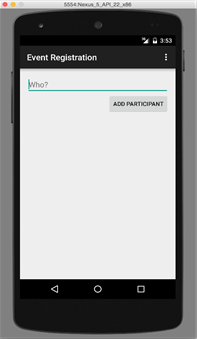
-
Open the content_main.xml file, which contains a default Hello World text.
-
Replace the highlighted default content with the following XML tags.
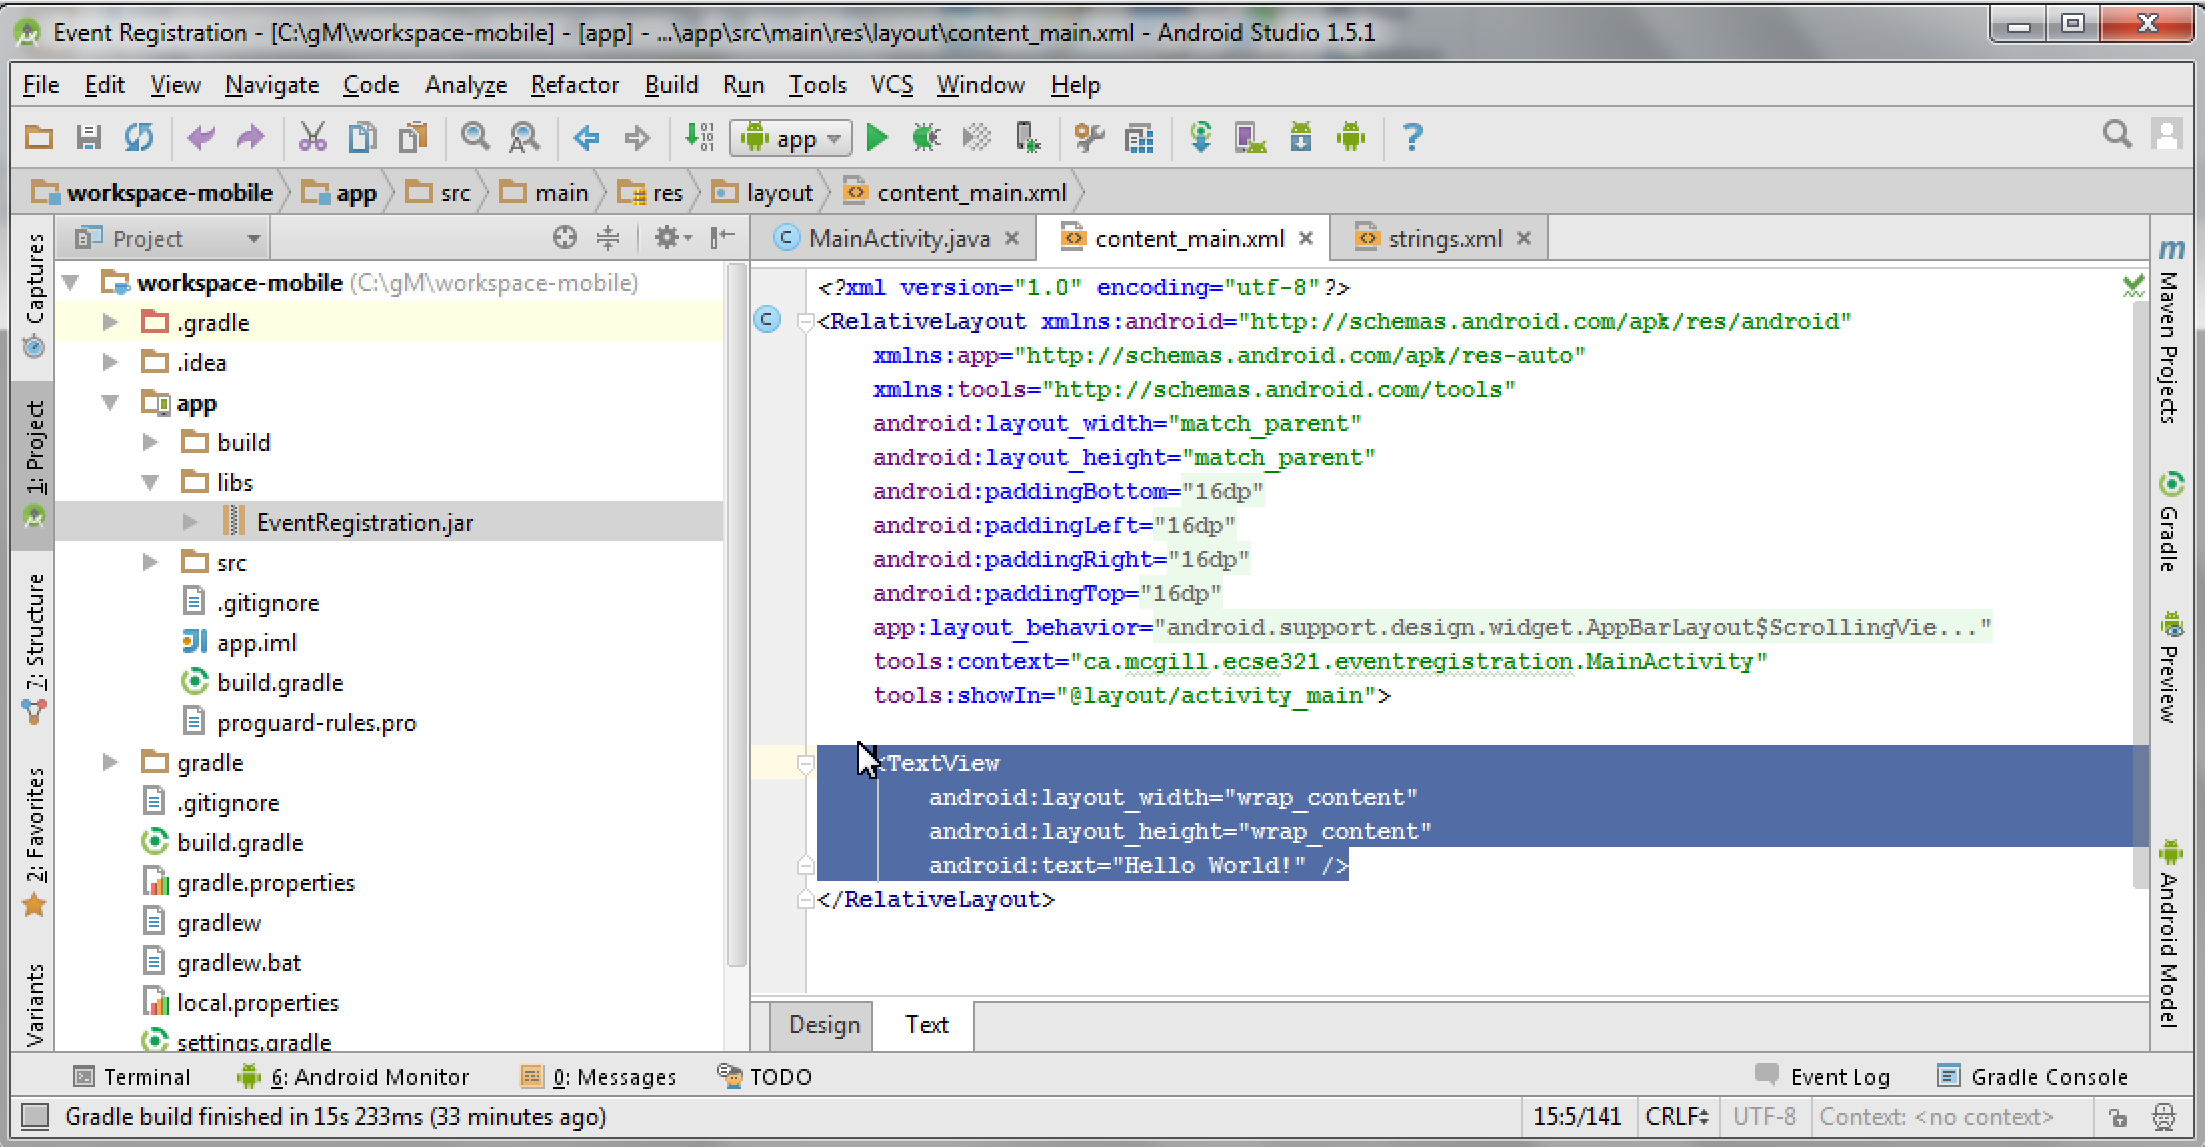
<LinearLayout
    android:layout_width="match_parent"
    android:layout_height="wrap_content"
    android:orientation="vertical">

    <TextView
            android:id="@+id/error"
            android:layout_height="wrap_content"
            android:layout_width="wrap_content"
            android:visibility="gone"
            android:text=""
            android:textColor="@color/colorAccent"/>

    <EditText
        android:layout_width="match_parent"
        android:layout_height="wrap_content"
        android:id="@+id/newparticipant_name"
        android:hint="@string/newparticipant_hint"/>

    <Button
        android:layout_width="wrap_content"
        android:layout_height="wrap_content"
        android:layout_gravity="end"
        android:text="@string/newparticipant_button"
        android:onClick="addParticipant"/>
</LinearLayout>
-
LinearLayout declares a vertical layout to hold the GUI elements;
-
EditText adds a textfield to enter the name of the participant;
-
Button provides a button to add a participant.
Some erroneous tags are marked in red, which will be corrected in the following steps.
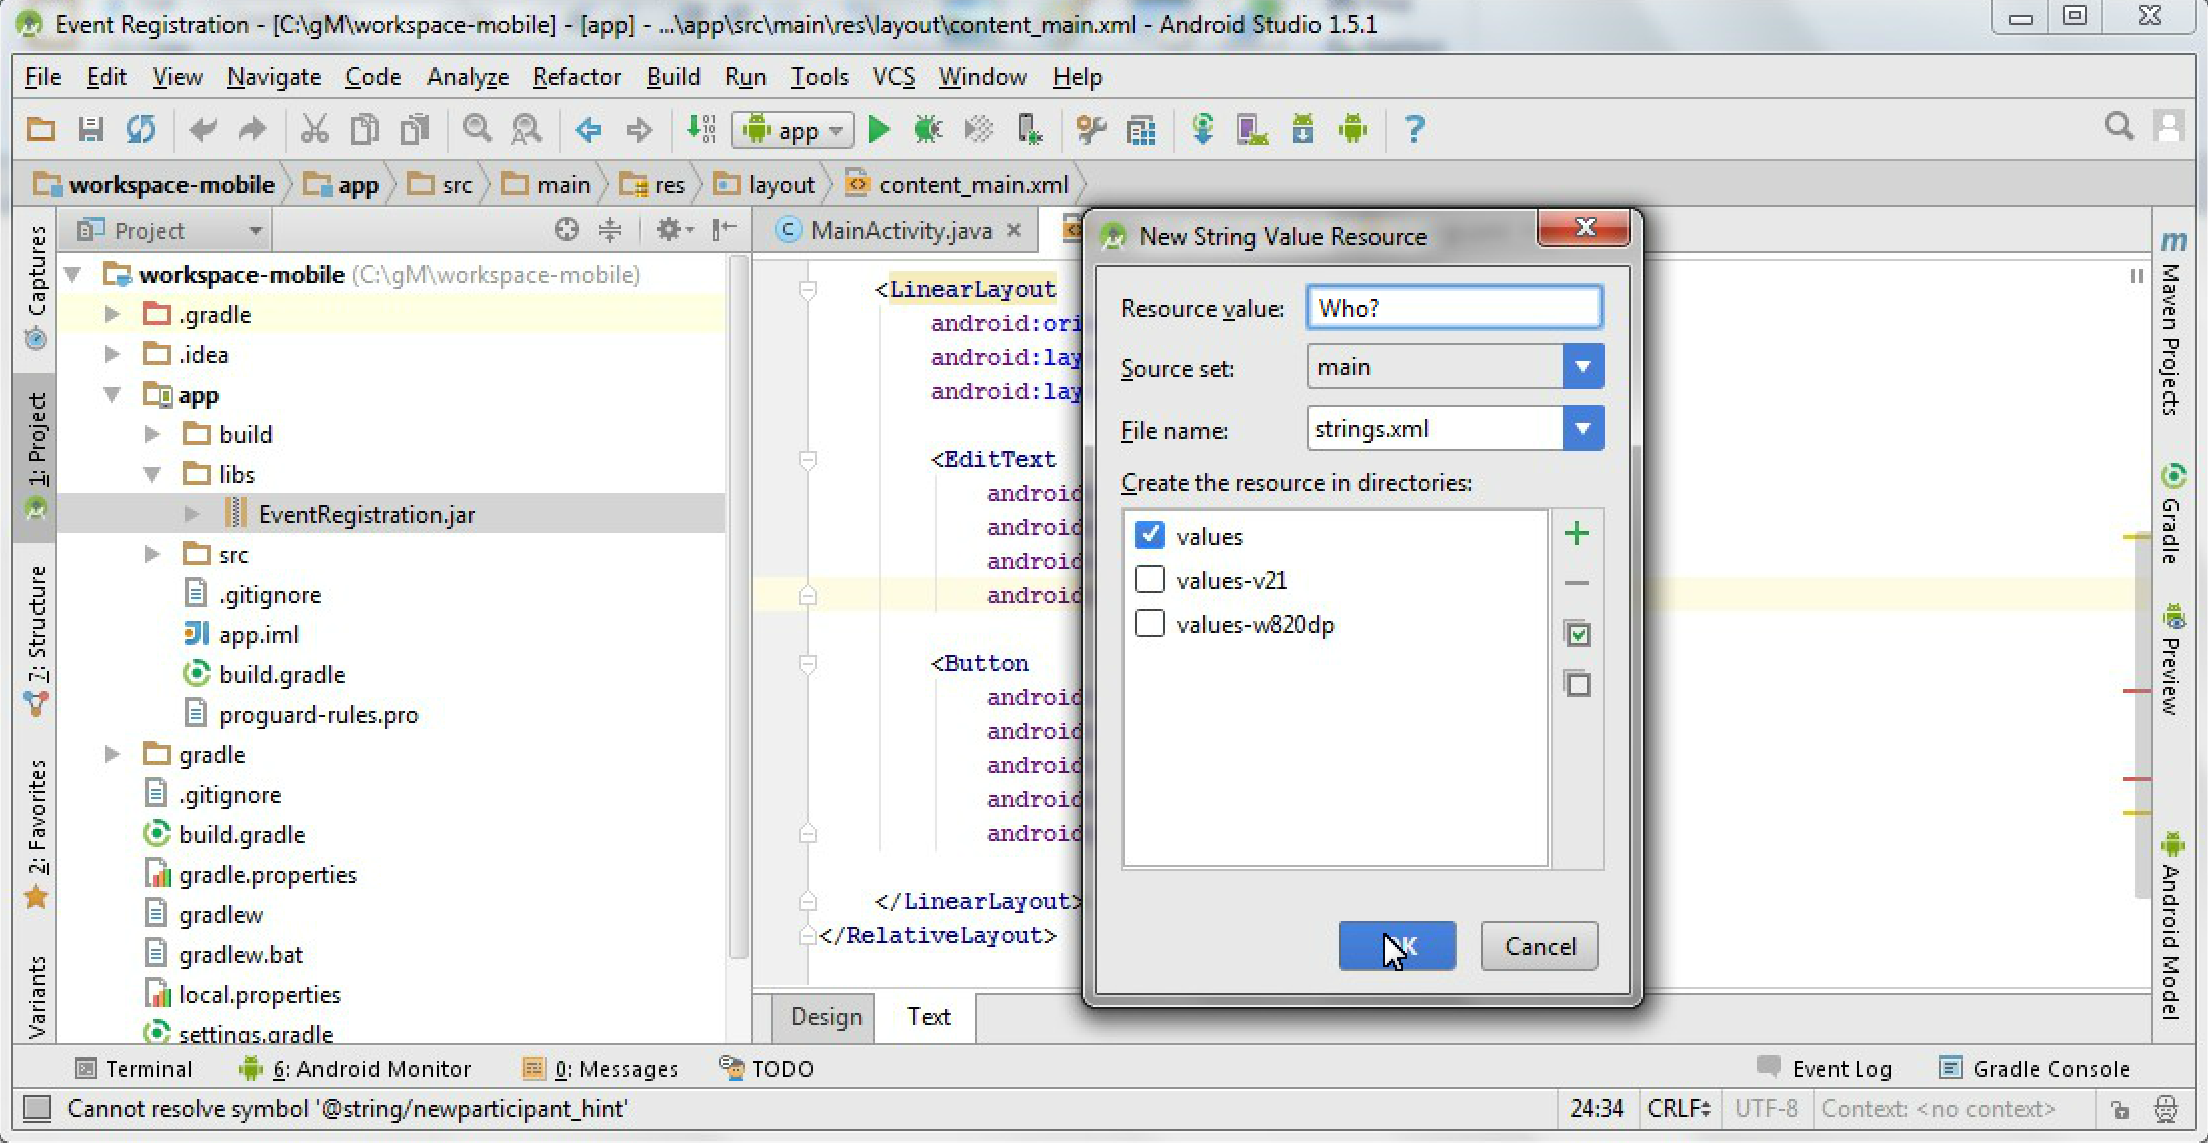
Specifying a text field
-
We change the user visible text as a string value resource by clicking on red quick fix marker.
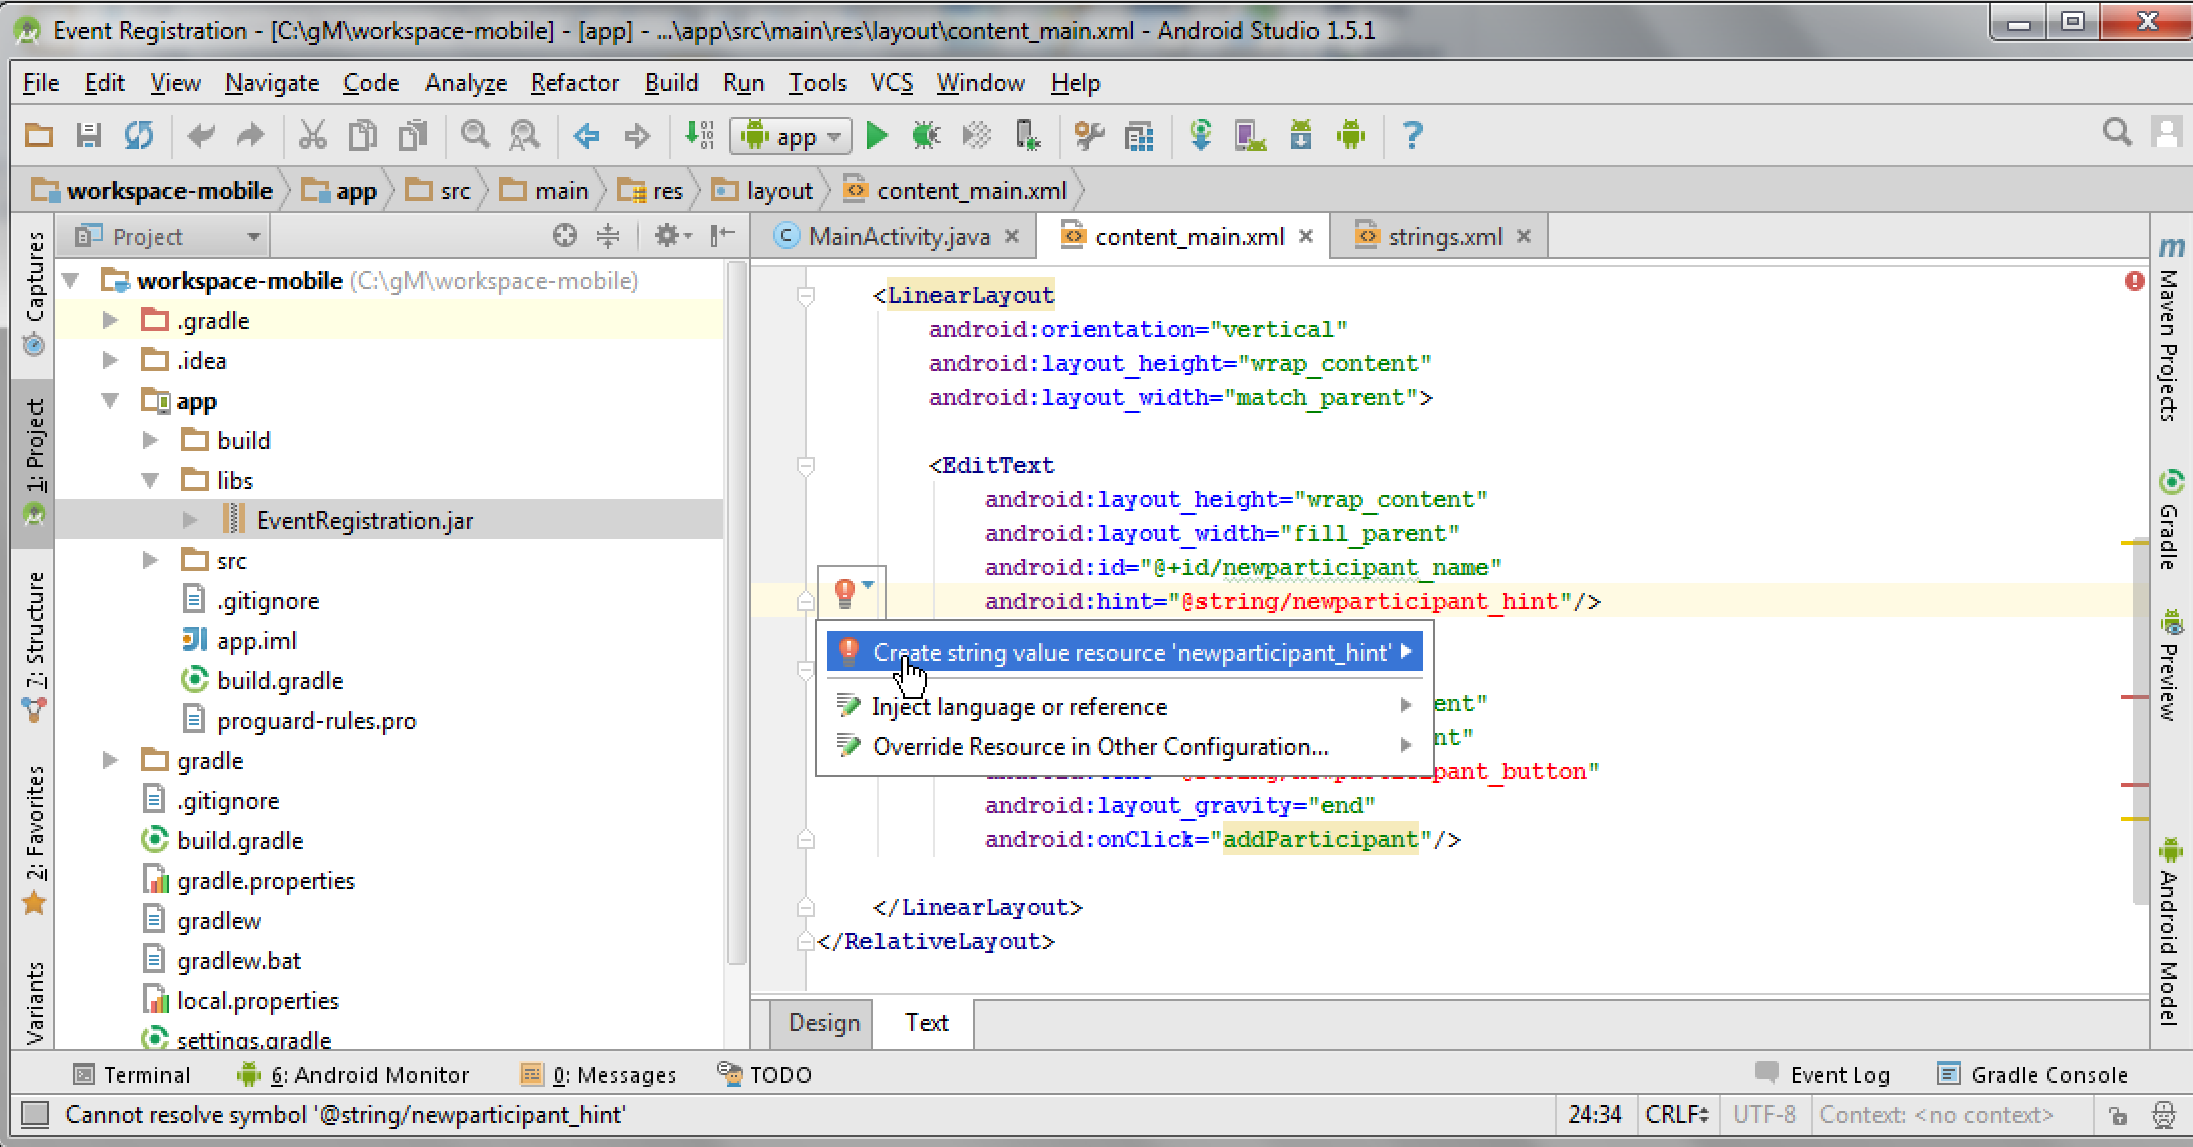
-
Add the default hint text (e.g. "Who?") in the pop-up window and leave all other settings on default values. Click on OK once done.
Specifying a button
-
Click on the red quick fix marker of the button to correct field @string/newparticipant_button
-
Write Add Participant as resource value in the pop-up window and click OK.
Observing the view
-
Save the file content_main.xml.
-
Click on the Design tab to check the graphical preview of the app.
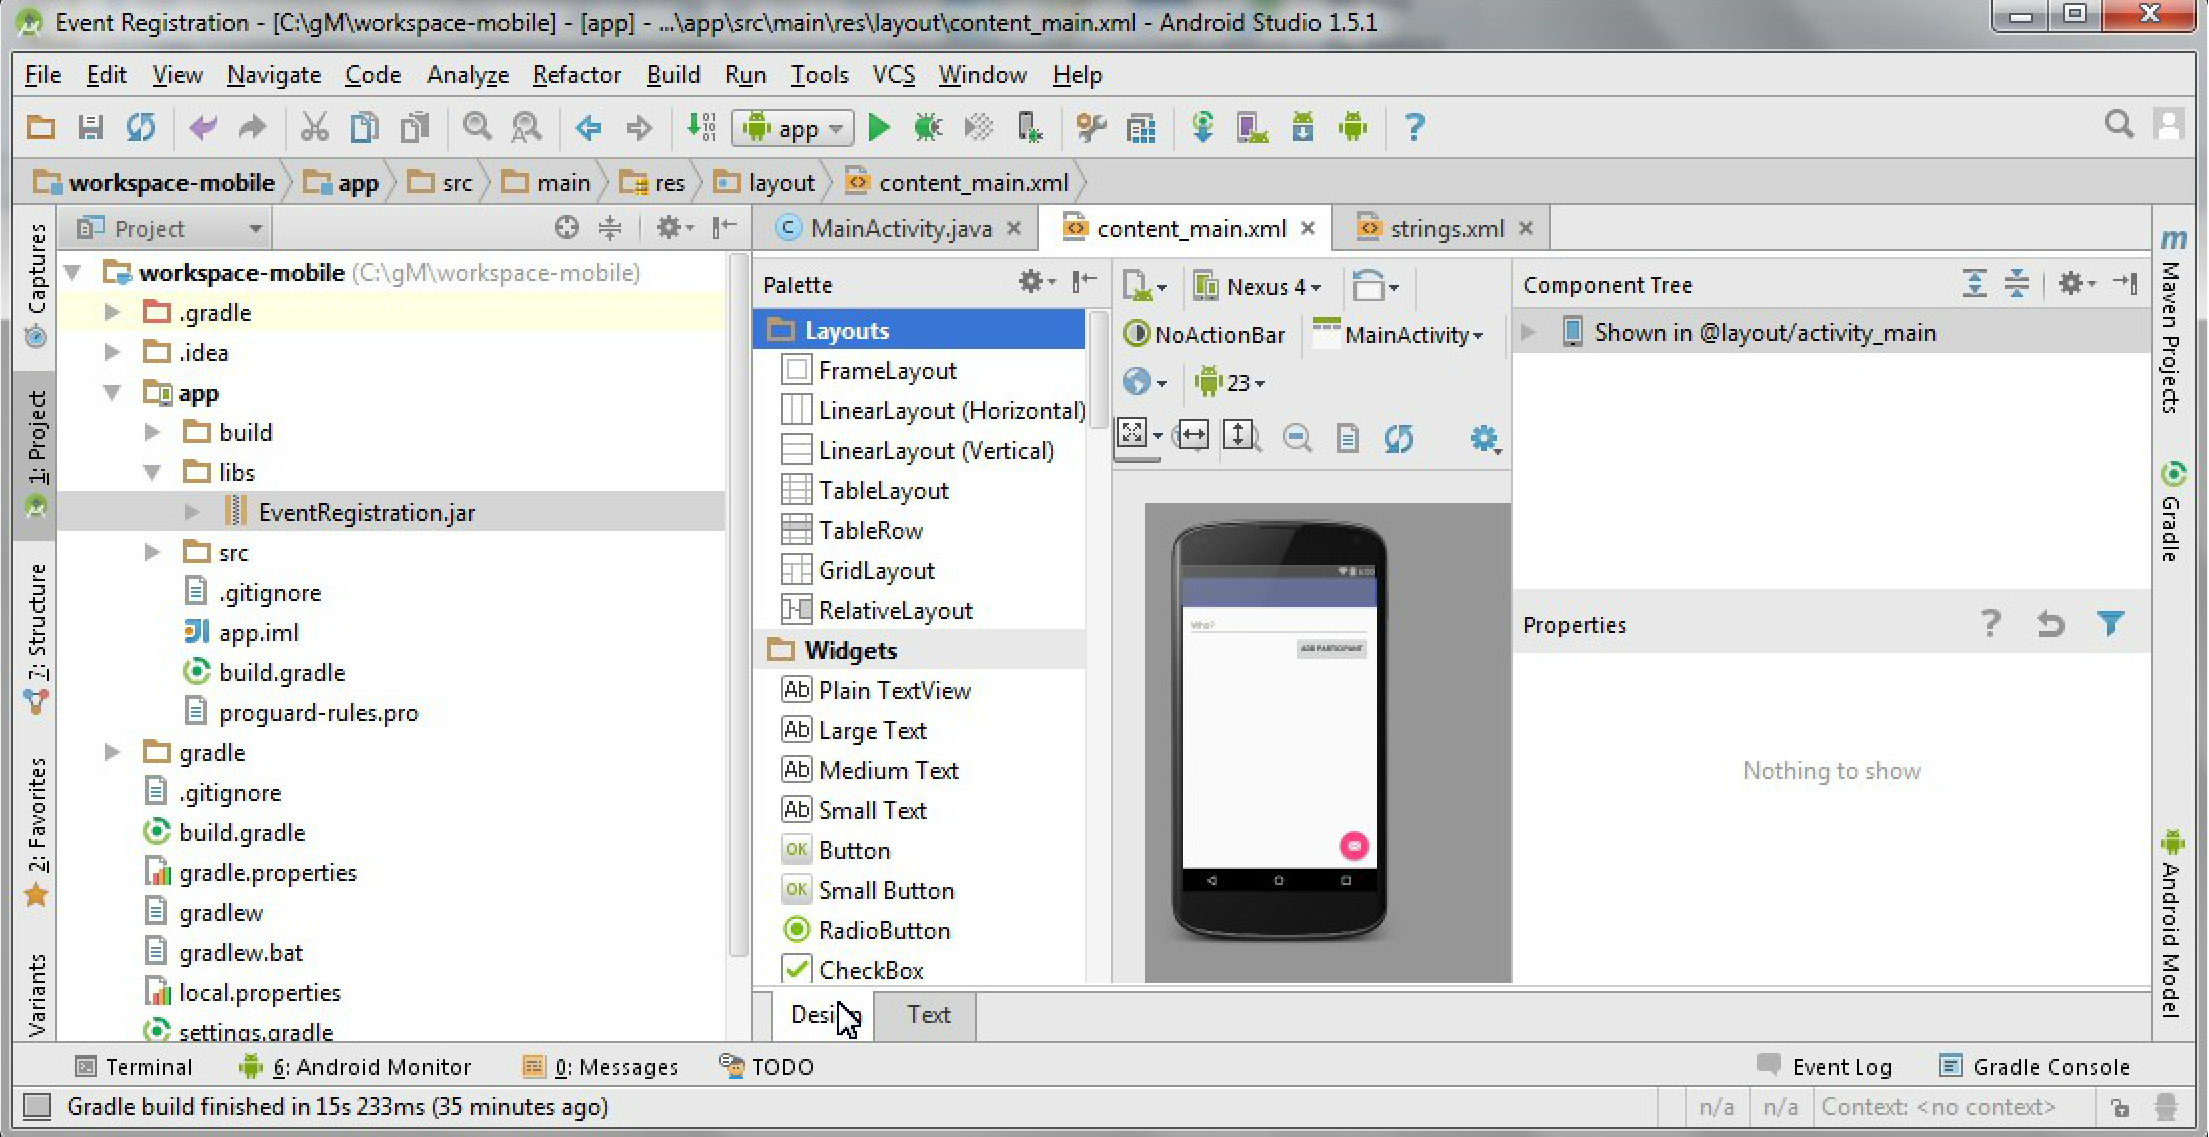
-
Open strings.xml if you wish to observe where the newly specified values can be changed in the future.
3.2.2. Connecting to backend via RESTful service calls
As a next step, we define a view depicted below and add Java code to provide behavior for the view, e.g. what should happen when the different buttons are clicked. The key interactions of our application are the following:
-
What to do when the application is launched? (
onCreate()) -
What to do when a button is clicked? (
addParticipant())
Create a utility class for communicating with HTTP messages
-
Make sure you have the
implementation 'com.loopj.android:android-async-http:1.4.9'dependency (among others) in thebuild.gradlefile for theappmodule -
Create the
HttpUtilsclass in theca.mcgill.ecse321.eventregistrationpackage and add missing imports as requiredpublic class HttpUtils { public static final String DEFAULT_BASE_URL = "http://heroku-app.heroku.com/"; private static String baseUrl; private static AsyncHttpClient client = new AsyncHttpClient(); static { baseUrl = DEFAULT_BASE_URL; } public static String getBaseUrl() { return baseUrl; } public static void setBaseUrl(String baseUrl) { HttpUtils.baseUrl = baseUrl; } public static void get(String url, RequestParams params, AsyncHttpResponseHandler responseHandler) { client.get(getAbsoluteUrl(url), params, responseHandler); } public static void post(String url, RequestParams params, AsyncHttpResponseHandler responseHandler) { client.post(getAbsoluteUrl(url), params, responseHandler); } public static void getByUrl(String url, RequestParams params, AsyncHttpResponseHandler responseHandler) { client.get(url, params, responseHandler); } public static void postByUrl(String url, RequestParams params, AsyncHttpResponseHandler responseHandler) { client.post(url, params, responseHandler); } private static String getAbsoluteUrl(String relativeUrl) { return baseUrl + relativeUrl; } }
Further helper methods
-
Open the MainActivity.java file.
-
Add a new attribute to the beginning of the class for error handling.
public class MainActivity extends AppCompatActivity { private String error = null; } -
Implement the
refreshErrorMessage()method as well to display the error message on the screen, if there is any.private void refreshErrorMessage() { // set the error message TextView tvError = (TextView) findViewById(R.id.error); tvError.setText(error); if (error == null || error.length() == 0) { tvError.setVisibility(View.GONE); } else { tvError.setVisibility(View.VISIBLE); } } -
Add code to initialize the application in the
onCreate()method (after the auto-generated code).@Override protected void onCreate(Bundle savedInstanceState) { // INSERT TO END OF THE METHOD AFTER AUTO-GENERATED CODE // initialize error message text view refreshErrorMessage(); }
Creating a handler for Add Participant button
-
Implement the
addParticipant()method as followspublic void addParticipant(View v) { error = ""; final TextView tv = (TextView) findViewById(R.id.newparticipant_name); HttpUtils.post("participants/" + tv.getText().toString(), new RequestParams(), new JsonHttpResponseHandler() { @Override public void onSuccess(int statusCode, Header[] headers, JSONObject response) { refreshErrorMessage(); tv.setText(""); } @Override public void onFailure(int statusCode, Header[] headers, Throwable throwable, JSONObject errorResponse) { try { error += errorResponse.get("message").toString(); } catch (JSONException e) { error += e.getMessage(); } refreshErrorMessage(); } }); } -
Import the missing classes again with Alt+Enter. There are multiple
Headerclasses available, you need to import thecz.msebera.android.httpclient.Headerclass.
3.3. Running and Testing the Application on a Virtual Device
-
Start the Spring backend application on Heroku, while ensure that the
DEFAULT_BASE_URLinHttpUtilsis configured accordingly. -
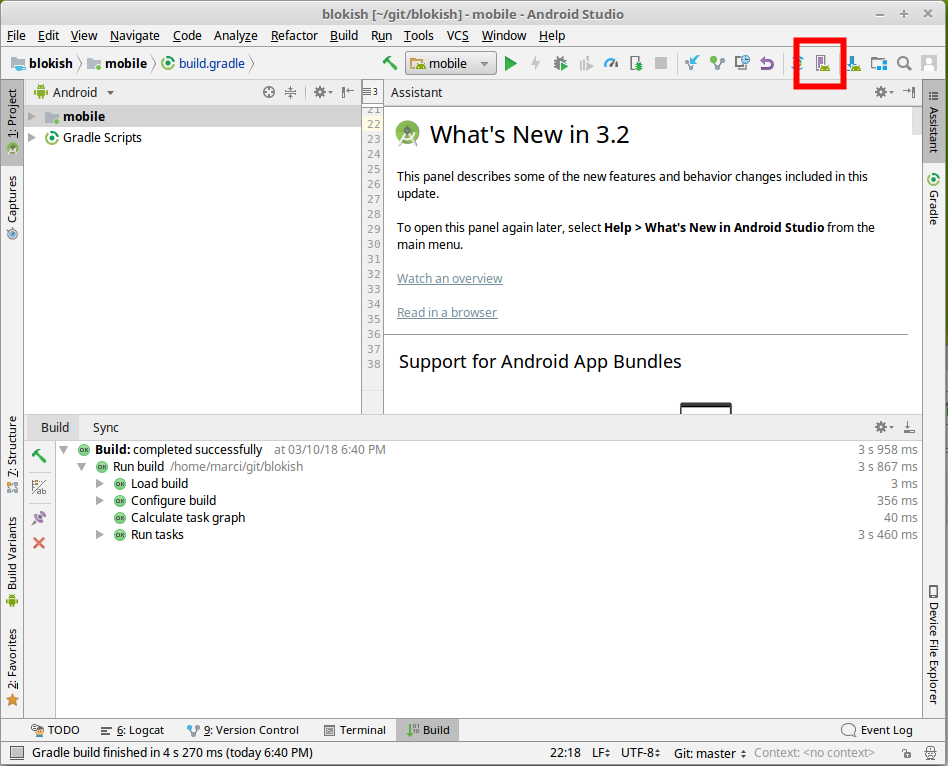
Click on the AVD manager button in Android Studio near the top right corner of the window
-
Add a new device with default settings.
NoteYou might be asked to download emulator files. If this happens, click OK. -
Start/Debug the application using the buttons highlighted on the figure below
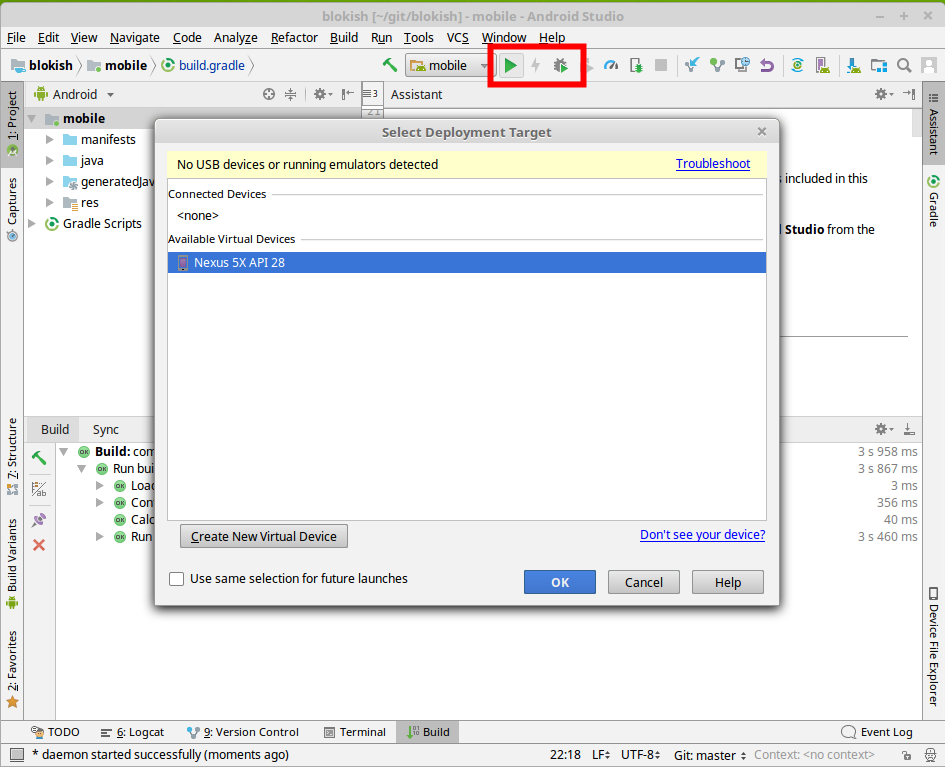
-
After you select the device (in this case Nexus 5X) as deployment target, the application will automatically be deployed and started within an Android VM, and it is ready to use. Be patient, deployment and startup may take a few seconds.
-
Leave the text field empty, then try adding a participant. You should get an error message on screen saying a participant cannot be added with no name.
-
Supply a name for a new participant, then try adding it. Upon successful completion, the text field and the error message should clear.
3.4. Developing for Android (Part 2)
|
Note
|
You can use the https://eventregistration-backend-123.herokuapp.com backend URL for the event registration example in the HttpUtils class.
|
As a next step, we extend the view and its behavior. Key interactions of our application added in this phase are the following:
-
What to do when the application is launched? (
onCreate()) -
What to do when application data is updated? (
refreshLists()) -
What to do when a button is clicked? (
addEvent(), andregister())
The expected layout of the application:
3.4.1. Create helper classes
-
Create the classes included in the next two steps within the
ca.mcgill.ecse321.eventregistrationpackage -
Create a new class called
DatePickerFragmentpublic class DatePickerFragment extends DialogFragment implements DatePickerDialog.OnDateSetListener { @Override public Dialog onCreateDialog(Bundle savedInstanceState) { // Use the current date as the default date in the picker final Calendar c = Calendar.getInstance(); int year = c.get(Calendar.YEAR); int month = c.get(Calendar.MONTH); int day = c.get(Calendar.DAY_OF_MONTH); // Parse the existing time from the arguments Bundle args = getArguments(); if (args != null) { year = args.getInt("year"); month = args.getInt("month"); day = args.getInt("day"); } // Create a new instance of DatePickerDialog and return it return new DatePickerDialog(getActivity(), this, year, month, day); } public void onDateSet(DatePicker view, int year, int month, int day) { MainActivity myActivity = (MainActivity)getActivity(); myActivity.setDate(getArguments().getInt("id"), day, month, year); } } -
Create a new class called
TimePickerFragmentpublic class TimePickerFragment extends DialogFragment implements TimePickerDialog.OnTimeSetListener { String label; @Override public Dialog onCreateDialog(Bundle savedInstanceState) { int hour = 0; int minute = 0; // Parse the existing time from the arguments Bundle args = getArguments(); if (args != null) { hour = args.getInt("hour"); minute = args.getInt("minute"); } // Create a new instance of TimePickerDialog and return it return new TimePickerDialog(getActivity(), this, hour, minute, DateFormat.is24HourFormat(getActivity())); } public void onTimeSet(TimePicker view, int hourOfDay, int minute) { MainActivity myActivity = (MainActivity)getActivity(); myActivity.setTime(getArguments().getInt("id"), hourOfDay, minute); } } -
Add the following helper methods within the
MainActivityclass to support date and time pickersprivate Bundle getTimeFromLabel(String text) { Bundle rtn = new Bundle(); String comps[] = text.toString().split(":"); int hour = 12; int minute = 0; if (comps.length == 2) { hour = Integer.parseInt(comps[0]); minute = Integer.parseInt(comps[1]); } rtn.putInt("hour", hour); rtn.putInt("minute", minute); return rtn; } private Bundle getDateFromLabel(String text) { Bundle rtn = new Bundle(); String comps[] = text.toString().split("-"); int day = 1; int month = 1; int year = 1; if (comps.length == 3) { day = Integer.parseInt(comps[0]); month = Integer.parseInt(comps[1]); year = Integer.parseInt(comps[2]); } rtn.putInt("day", day); rtn.putInt("month", month-1); rtn.putInt("year", year); return rtn; } public void showTimePickerDialog(View v) { TextView tf = (TextView) v; Bundle args = getTimeFromLabel(tf.getText().toString()); args.putInt("id", v.getId()); TimePickerFragment newFragment = new TimePickerFragment(); newFragment.setArguments(args); newFragment.show(getSupportFragmentManager(), "timePicker"); } public void showDatePickerDialog(View v) { TextView tf = (TextView) v; Bundle args = getDateFromLabel(tf.getText().toString()); args.putInt("id", v.getId()); DatePickerFragment newFragment = new DatePickerFragment(); newFragment.setArguments(args); newFragment.show(getSupportFragmentManager(), "datePicker"); } public void setTime(int id, int h, int m) { TextView tv = (TextView) findViewById(id); tv.setText(String.format("%02d:%02d", h, m)); } public void setDate(int id, int d, int m, int y) { TextView tv = (TextView) findViewById(id); tv.setText(String.format("%02d-%02d-%04d", d, m + 1, y)); }
3.4.2. Update view definition
-
The corresponding (but partly incomplete) view definition in the
content_main.xmlfile is the following:<?xml version="1.0" encoding="utf-8"?> <RelativeLayout xmlns:android="http://schemas.android.com/apk/res/android" xmlns:app="http://schemas.android.com/apk/res-auto" xmlns:tools="http://schemas.android.com/tools" android:id="@+id/content_main" android:layout_width="match_parent" android:layout_height="match_parent" android:paddingBottom="16dp" android:paddingLeft="16dp" android:paddingRight="16dp" android:paddingTop="16dp" app:layout_behavior="@string/appbar_scrolling_view_behavior" tools:context="ca.mcgill.ecse321.eventregistration.MainActivity" tools:showIn="@layout/activity_main"> <LinearLayout android:layout_height="wrap_content" android:layout_width="match_parent" android:orientation="vertical"> <TextView android:id="@+id/error" android:layout_height="wrap_content" android:layout_width="wrap_content" android:visibility="gone" android:text="" android:textColor="@color/colorAccent"/> <LinearLayout android:layout_height="wrap_content" android:layout_width="match_parent" android:orientation="vertical"> <LinearLayout android:layout_width="wrap_content" android:layout_height="match_parent" android:orientation="vertical"> <LinearLayout android:orientation="horizontal" android:layout_height="wrap_content" android:layout_width="match_parent"> <TextView android:layout_height="wrap_content" android:layout_width="wrap_content" android:text="@string/participantspinner_label"/> <Spinner android:layout_height="wrap_content" android:layout_width="wrap_content" android:layout_gravity="end" android:id="@+id/participantspinner"/> </LinearLayout> <LinearLayout android:orientation="horizontal" android:layout_height="wrap_content" android:layout_width="match_parent"> <TextView android:layout_height="wrap_content" android:layout_width="wrap_content" android:text="@string/eventspinner_label"/> <Spinner android:id="@+id/eventspinner" android:layout_width="match_parent" android:layout_height="wrap_content" android:layout_gravity="end" android:layout_margin="0dp"/> </LinearLayout> </LinearLayout> <!-- TODO add a Register and Refresh Lists buttons here --> </LinearLayout> <View android:layout_height="2dp" android:layout_width="fill_parent" android:background="#16552e"/> <LinearLayout android:orientation="vertical" android:layout_height="wrap_content" android:layout_width="match_parent"> <EditText android:layout_width="match_parent" android:layout_height="wrap_content" android:id="@+id/newparticipant_name" android:hint="@string/newparticipant_hint"/> <Button android:layout_width="wrap_content" android:layout_height="wrap_content" android:layout_gravity="end" android:text="@string/newparticipant_button" android:onClick="addParticipant"/> </LinearLayout> <View android:layout_height="2dp" android:layout_width="fill_parent" android:background="#16552e"/> <LinearLayout android:layout_width="match_parent" android:layout_height="wrap_content" android:orientation="vertical"> <EditText android:id="@+id/newevent_name" android:layout_height="wrap_content" android:layout_width="fill_parent" android:hint="@string/newevent_hint"/> <LinearLayout android:orientation="horizontal" android:layout_height="wrap_content" android:layout_width="match_parent"> <TextView android:layout_height="wrap_content" android:layout_width="0dp" android:layout_weight="1" android:text="@string/newevent_date_label"/> <TextView android:layout_height="wrap_content" android:layout_width="wrap_content" android:text="@string/newevent_date_first" android:layout_gravity="end" android:id="@+id/newevent_date" android:onClick="showDatePickerDialog"/> </LinearLayout> <LinearLayout android:orientation="horizontal" android:layout_height="wrap_content" android:layout_width="match_parent"> <TextView android:layout_height="wrap_content" android:layout_width="0dp" android:layout_weight="1" android:text="@string/starttime_label"/> <TextView android:layout_height="wrap_content" android:layout_width="wrap_content" android:text="@string/starttime_first" android:layout_gravity="end" android:id="@+id/starttime" android:onClick="showTimePickerDialog"/> </LinearLayout> <!-- TODO add a label and a time picker for event end time --> <!-- TODO add Add Event button here --> </LinearLayout> </LinearLayout> </RelativeLayout> -
The missing string definitions go in the
res/values/strings.xmlresource<resources> <string name="app_name">Event Registration</string> <string name="action_settings">Settings</string> <string name="newparticipant_hint">Who?</string> <string name="newparticipant_button">Add Participant</string> <string name="newevent_date_label">Date?</string> <string name="participantspinner_label">Participant?</string> <string name="eventspinner_label">Event?</string> <string name="starttime_label">Start time?</string> <string name="newevent_date_first">01-01-2017</string> <string name="starttime_first">10:00</string> </resources>-
TODO: add a Register button to allow registering a selected participant to a selected event (call the
register()method when clicked - this is to be implemented in the upcoming steps) -
TODO: add a Refresh Lists button that refreshes the contents of the event and participant spinners (call the
refreshLists()method when clicked) -
TODO: add a label with text End? below the Start? label
-
TODO: add a time picker to select the end time of a new event
-
TODO: add an Add Event button to allow creating new events from the user interface (call the
addEvent()method when clicked - this is to be implemented in the upcoming steps)
-
3.4.3. Initialization on application launch
-
Open the MainActivity.java file.
-
Add a few new attributes to the beginning of the class as helpers for persistence and error handling.
public class MainActivity extends AppCompatActivity { private String error = null; // APPEND NEW CONTENT STARTING FROM HERE private List<String> participantNames = new ArrayList<>(); private ArrayAdapter<String> participantAdapter; private List<String> eventNames = new ArrayList<>(); private ArrayAdapter<String> eventAdapter; //... }-
Import missing classes (e.g. use Alt+Enter)
-
-
Add code to initialize the application with data from the server in the
onCreate()method (after the auto-generated code).@Override protected void onCreate(Bundle savedInstanceState) { // ... // INSERT TO END OF THE METHOD // Add adapters to spinner lists and refresh spinner content Spinner participantSpinner = (Spinner) findViewById(R.id.participantspinner); Spinner eventSpinner = (Spinner) findViewById(R.id.eventspinner); participantAdapter = new ArrayAdapter<String>(this, android.R.layout.simple_spinner_item, participantNames); participantAdapter.setDropDownViewResource(android.R.layout.simple_spinner_dropdown_item); participantSpinner.setAdapter(participantAdapter); eventAdapter = new ArrayAdapter<String>(this, android.R.layout.simple_spinner_item, eventNames); eventAdapter.setDropDownViewResource(android.R.layout.simple_spinner_dropdown_item); eventSpinner.setAdapter(eventAdapter); // Get initial content for spinners refreshLists(this.getCurrentFocus()); }
At this point the refreshLists() method is missing, this is to be implemented in the upcoming steps.
3.4.4. Reactions to updated data
-
Create the missing new method
refreshLists()which seeks for the event and participant spinners and sets their content according to the data retrieved from the serverpublic void refreshLists(View view) { refreshList(participantAdapter ,participantNames, "participants"); refreshList(eventAdapter, eventNames, "events"); } private void refreshList(ArrayAdapter<String> adapter, List<String> names, String restFunctionName) { HttpUtils.get(restFunctionName, new RequestParams(), new JsonHttpResponseHandler() { @Override public void onSuccess(int statusCode, Header[] headers, JSONArray response) { names.clear(); names.add("Please select..."); for( int i = 0; i < response.length(); i++){ try { names.add(response.getJSONObject(i).getString("name")); } catch (Exception e) { error += e.getMessage(); } refreshErrorMessage(); } adapter.notifyDataSetChanged(); } @Override public void onFailure(int statusCode, Header[] headers, Throwable throwable, JSONObject errorResponse) { try { error += errorResponse.get("message").toString(); } catch (JSONException e) { error += e.getMessage(); } refreshErrorMessage(); } }); }You may have error messages on names and adapter. This may indicate that you are using an old version of the Java compiler for the project. You either change it to a more recent version, or you add the
finalkeyword before the two variables in the list of parameters. -
Implement the
addEvent()methodpublic void addEvent(View v) { // start time TextView tv = (TextView) findViewById(R.id.starttime); String text = tv.getText().toString(); String comps[] = text.split(":"); int startHours = Integer.parseInt(comps[0]); int startMinutes = Integer.parseInt(comps[1]); // TODO get end time // date tv = (TextView) findViewById(R.id.newevent_date); text = tv.getText().toString(); comps = text.split("-"); int year = Integer.parseInt(comps[2]); int month = Integer.parseInt(comps[1]); int day = Integer.parseInt(comps[0]); // name tv = (TextView) findViewById(R.id.newevent_name); String name = tv.getText().toString(); // Reminder: calling the service looks like this: // http://192.168.56.50:8088/createEvent?eventName=tst&date=2013-10-23&startTime=00:00&endTime=23:59 RequestParams rp = new RequestParams(); NumberFormat formatter = new DecimalFormat("00"); rp.add("date", year + "-" + formatter.format(month) + "-" + formatter.format(day)); rp.add("startTime", formatter.format(startHours) + ":" + formatter.format(startMinutes)); // TODO add end time as parameter HttpUtils.post("events/" + name, rp, new JsonHttpResponseHandler() { @Override public void onSuccess(int statusCode, Header[] headers, JSONObject response) { refreshErrorMessage(); ((TextView) findViewById(R.id.newevent_name)).setText(""); } @Override public void onFailure(int statusCode, Header[] headers, Throwable throwable, JSONObject errorResponse) { try { error += errorResponse.get("message").toString(); } catch (JSONException e) { error += e.getMessage(); } refreshErrorMessage(); } }); }-
TODO: get the end time of the new event
-
TODO: supply the end time to the REST request as an additional parameter
-
-
Implement the
register()methodpublic void register(View v) { Spinner partSpinner = (Spinner) findViewById(R.id.participantspinner); Spinner eventSpinner = (Spinner) findViewById(R.id.eventspinner); error = ""; // TODO issue an HTTP POST here // Set back the spinners to the initial state after posting the request partSpinner.setSelection(0); eventSpinner.setSelection(0); refreshErrorMessage(); }-
TODO: implement the HTTP POST part of the
register()method on your own
-
4. Web Frontend with Vue.js
4.1. Installation Instructions: Vue.js
Vue.js is a popular web frontend for building user interfacs in Javascript, which is considered to be easier to learn compared to React and Angular.
4.1.1. Install Vue.js
-
Open a shell (or run cmd.exe in Windows)
-
Check that you successfully installed git, node.js and npm e.g. by checking their versions:
$ git --version
git version 2.17.1
$ node -v
v8.9.3
$ npm -v
5.6.0
If you don’t have these tools, download node and npm from here and Git from here.
-
Install the command line interface for Vue (Vue-CLI):
npm install --global vue-cli
4.1.2. Generate initial Vue.js project content
-
Navigate to a folder where you would like to create your Event Registration System frontend. For this tutorial, we will assume that this folder is
~/git/EventRegistration.$ cd ~/git/EventRegistration -
Generate initial content as follows
-
Hit Enter after each line after answering the questions as indicated below
-
Detailed instructions at https://github.com/vuejs-templates/webpack and https://bootstrap-vue.js.org/docs
$ vue init bootstrap-vue/webpack EventRegistration-Web
? Project name (EventRegistration-Web) eventregistration-web
? Project description (A Vue.js project) A Vue.js web frontend for Event Registration App
? Author (varrodan <daniel.varro@gmail.com>)
? Vue build (Use arrow keys):
> Runtime + Compiler
  Runtime-only
? Install vue-router (Y/n): Y
? Use ESLint to lint your code (Y/n): n
? Setup unit tests with Karma + Mocha (Y/n) Y
? Setup e2e tests with Nightwatch (Y/n) Y

vue-cli · Generated "EventRegistration-Web".
-
-
Now execute the following commands (one after the other)
$ cd EventRegistration-Web $ npm install $ npm run dev -
As a result, a sample web page should appear at http://localhost:8080/
-
You can stop this development server by pressing Ctrl+C in the shell
-
Install Axios (for later use):
npm install --save axios
4.1.3. Setting up your development server
-
For the development server only, we change the default port to 8087 (the default is 8080) using a configuration file. The rationale behind this step is that other services running locally (such as the backend server) may already listen at the default localhost:8080 socket which may clash with our frontend development server.
-
Open ./config/index.js and add
port: 8087tomodule.exports(only thedevpart)-
The development server is set up at localhost, i.e. http://localhost:8087
-
We also store the host IP address and port of the backend server in similar environment variables (
backendHostandbackendPort). -
If you don’t have your Event Registration Backend up and running, you can use the backend address https://eventregistration-backend-123.herokuapp.com/
module.exports = {
  build: {
    //...
  },
  dev: {
    env: require('./dev.env'),
    port: 8087,
    host:  'localhost',
    backendHost: 'eventregistration-backend-123.herokuapp.com',
    backendPort: 80,
    //...
  }
}
-
-
Open ./build/dev-server.js, and change the
uriassignment as follows:-
In line 68 (or around that part) commented the following line and the two new lines below.
//var uri = 'http://localhost:' + port
var host = config.dev.host
var uri = 'http://' + host + ':' + port
-
-
Start again your development server by
npm run dev. The same web application should now appear at http://localhost:8087/ -
Stop the development server by Ctrl+C.
4.2. Create a Static Vue.js Component
Vue.js promotes the use of components which encapsulate GUI elements and their behavior in order to build up rich user interfaces in a modular way. A component consists of
-
template: A template of (a part of) an HTML document enriched with data bindings, conditional expressions, loops, etc.
-
script: The behavior of the user interface programmed in JavaScript.
-
style: The customized graphical appearance of HTML document elements.
We will first create a new Vue.js component and then connect it to a backend Java Spring service via a Rest API call.
4.2.1. Create a component file
-
Create a new file EventRegistration.vue in ./src/components with the following initial content:
<template> <!-- TODO --> </template> <script> // TODO </script> <style> <!-- TODO --> </style> -
Create some static HTML content of the template part starting with a
<div>element corresponding to your component. We<template> <div id="eventregistration"> <h2>Participants</h2> <table> <tr> <td>John</td> <td>Event to attend</td> </tr> <tr> <td> <input type="text" placeholder="Participant Name"> </td> <td> <button>Create</button> </td> </tr> </table> <p> <span style="color:red">Error: Message text comes here</span> </p> </div> </template> -
Customize the
<style>part with your designated CSS content. A detailed CSS reference documentation is available at https://www.w3schools.com/CSSref/. The final result of that part should like as follows.<style> #eventregistration { font-family: 'Avenir', Helvetica, Arial, sans-serif; color: #2c3e50; background: #f2ece8; } </style>
4.2.2. Create a new routing command
-
We need to route certain HTTP calls to a specific URL to be handled by EventRegistration.vue.
-
Open ./src/router/index.js and add a new route by extending the existing
routesproperty.export default new Router({ routes: [ { path: '/', name: 'Hello', component: Hello }, { path: '/app', name: 'EventRegistration', component: EventRegistration } ] })-
You should not change the number of spaces used as indentation otherwise you get error messages.
-
Import the new component
EventRegistration.vueat the beginning of ./src/router/index.js after all existing imports!// add import after all existing imports import EventRegistration from '@/components/EventRegistration'
-
-
Start the development server and navigate your browser to http://localhost:8087/#/app. Your new Vue.js component should be rendered (with the static HTML content).
4.3. Vue.js Components with Dynamic Content
4.3.1. Add data and event handlers
Next we add event handling and dynamic content to our EventRegistration.vue component.
-
Create another file ./src/components/registration.js which will contain the Javascript code for the EventRegistration.vue component.
-
Create constructor methods:
function ParticipantDto (name) { this.name = name this.events = [] } function EventDto (name, date, start, end) { this.name = name this.eventDate = date this.startTime = start this.endTime = end } -
Add data variables to the export declaration of the component (in the same registration.js file).
export default { name: 'eventregistration', data () { return { participants: [], newParticipant: '', errorParticipant: '', response: [] } } } -
Add an initialization function below the data part (don’t forget to add a colon (
,) afterdata {…})created: function () { // Test participants const p1 = new ParticipantDto('John') const p2 = new ParticipantDto('Jill') // Test event for p2 participant p2.events=[{"name":"Halloween party","eventDate":"2018-10-31","startTime":"18:00","endTime":"23:00"}] // Sample initial content this.participants = [p1, p2] } -
Add event handling method createParticipant():
methods: {
  createParticipant: function (participantName) {
    // Create a new participant and add it to the list of participants
    var p = new ParticipantDto(participantName)
    this.participants.push(p)
    // Reset the name field for new participants
    this.newParticipant = ''
  }
}
4.3.2. Create dynamic data bindings
-
Open
EventRegistration.vueand link the Javascript file as script:<script src="./registration.js"> </script> -
Change the static template content for the participant list to dynamic bindings:
-
We iterate along all participants in data property
participantsand dynamically print their name by{{ participant.name }}(see list rendering) -
We print the (currently empty) list of events to which a participant is registered to.
<table>
  <tr v-for="participant in participants" >
      <td>{{ participant.name }}</td>
      <td>
        <ul>
          <li v-for="event in participant.events">
            {{event.name}}
          </li>
        </ul>
      </td>
  </tr>
<!-- Input field and button should be kept here -->
</table>
-
-
Link input field content with data variable
newParticipantand button clicks for Create Participant for event handler methodcreateParticipant().<table> <!-- Table with dynamic content --> <tr> <td> <input type="text" v-model="newParticipant" placeholder="Participant Name"> </td> <td> <button @click="createParticipant(newParticipant)">Create Participant</button> </td> </tr> </table> -
Bind the error message to the corresponding variable
errorParticipantby extending the<span>tag with conditional rendering.-
The error message will only appear if the data property
errorParticipantis not empty. -
You may wish to further refine error handling in case of empty string content for
newParticipantby adding&& !newParticipantto the condition.<span v-if="errorParticipant" style="color:red">Error: {{errorParticipant}} </span>
-
-
Run your frontend application and observe that two participants are listed.
4.4. Calling Backend Services
Next we change our frontend to issue calls to the backend via the Rest API provided by the Java Spring framework.
4.4.1. Changes in the backend service
|
Note
|
As long as you are working with the backend provided with this tutorial you can skip this subsection. However, when you are implementing you own service, you may need to add the following to your application as well. |
-
Open the open the backend project with your favourite IDE (e.g., Eclipse)
-
To enable Cross-Origin Resource Sharing (CORS) for request coming from the frontend, add the
@CrossOriginannotation to the service class.@CrossOrigin @RestController public class EventRegistrationController { // ... } -
Deploy (either locally or on Heroku) and run the main as a Spring application.
4.4.2. Calling backend services in from Vue.js components
We need to modify our frontend to make calls to backend services.
-
Open ./src/components/registration.js and add the following content to the beginning:
-
Note that instead of hard-wired IP addresses and ports, details are given in a configuration file.
import axios from 'axios'
var config = require('../../config')

var frontendUrl = 'http://' + config.dev.host + ':' + config.dev.port
var backendUrl = 'http://' + config.dev.backendHost + ':' + config.dev.backendPort

var AXIOS = axios.create({
  baseURL: backendUrl,
  headers: { 'Access-Control-Allow-Origin': frontendUrl }
})
-
-
Now navigate to the created function, and replace existing content with the following lines:
created: function () { // Initializing participants from backend AXIOS.get(`/participants`) .then(response => { // JSON responses are automatically parsed. this.participants = response.data }) .catch(e => { this.errorParticipant = e; }); } -
Navigate to the createParticipant() method and change its content as follows:
createParticipant: function (participantName) { AXIOS.post(`/participants/`+participantName, {}, {}) .then(response => { // JSON responses are automatically parsed. this.participants.push(response.data) this.newParticipant = '' this.errorParticipant = '' }) .catch(e => { var errorMsg = e.message console.log(errorMsg) this.errorParticipant = errorMsg }); } -
Run the frontend application and check that
-
New participants can be added
-
They immediately appear in the participant list.
-
4.5. Additional steps in the tutorial
4.5.1. Steps to complete
The description of the next steps is intentionally high-level and sketchy to force you to face and solve several emerging problems.
You need to provide the following functionality by extending the Vue.js component:
-
List all events (name, date, startTime, endTime)
-
Introduce an array events in the frontend data store
-
Call the appropriate backend service to fill the contents
-
Provide a dynamic list in the component and bind it to events
-
-
Create a new event (name, date, startTime, endTime)
-
Introduce an object newEvent in the frontend data store with four properties (e.g. name, date, startTime, endTime).
-
Set the initial values of these properties to something
-
-
Provide a button to initiate creating a new event
-
Provide HTML input fields to set event details
-
Create a call to the appropriate backend service, i.e. createEvent()
-
Introduce an object errorEvent for error message related to event creation
-
Provide corresponding HTML field for displaying the error message (e.g.
<span>), and set its appearance condition to the content of the error message -
Hint: you can use the following input types for setting date and time
<input type="date" v-model="newEvent.eventDate" placeholder="YYYY-MM-DD">
<input type="time" v-model="newEvent.startTime" placeholder="HH:mm">
-
-
Register a participant to an event (when a new event should occur in the list of events printed next to a participant)
-
Provide a selection of participants
-
You need a corresponding data variable (e.g. selectedParticipant)
-
You can use the HTML
<select v-model="selectedParticipant">tag where each option (<option>tag withv-forVue.js parameter) is filled dynamically from the list of participants. -
Hint: You can add a first disabled option as follows:
<option disabled value="">Please select one</option>
-
-
Provide a selection of events in a similar way.
-
Provide a button to initiate registration
-
Enable the button only if both a participant and an event are selected
-
-
In all use cases,
-
Report application specific errors if the backend service fails
-
Prevent to enter invalid data to backend
-
4.5.2. Further documentation
-
Vue.js guide: https://vuejs.org/v2/guide/
-
Vue.js API: https://vuejs.org/v2/api/
-
Build commands: http://vuejs-templates.github.io/webpack/commands.html
-
Vue.js and Webpack integration: http://vuejs-templates.github.io/webpack/env.html
-
Html-Webpack: https://github.com/jantimon/html-webpack-plugin
-
Vue Router: https://github.com/vuejs/vue-router
-
Vue Router tutorial: https://scotch.io/tutorials/getting-started-with-vue-router
5. Quality Assurance
5.1. GitHub Code Reviews
-
Create a new repository under your account and name it ecse321-QA. Make sure to initialize it with a README upon creation.
-
Clone the repository
-
Create & checkout a new branch named called
documentation. (git branch documentation && git checkout documentation) -
Edit
README.md.
# ecse321-QA

A test project for code review on GitHub.-
Commit your changes and push this
documentationbranch. (git add . && git commit -m "Adding brief project description" && git push) -
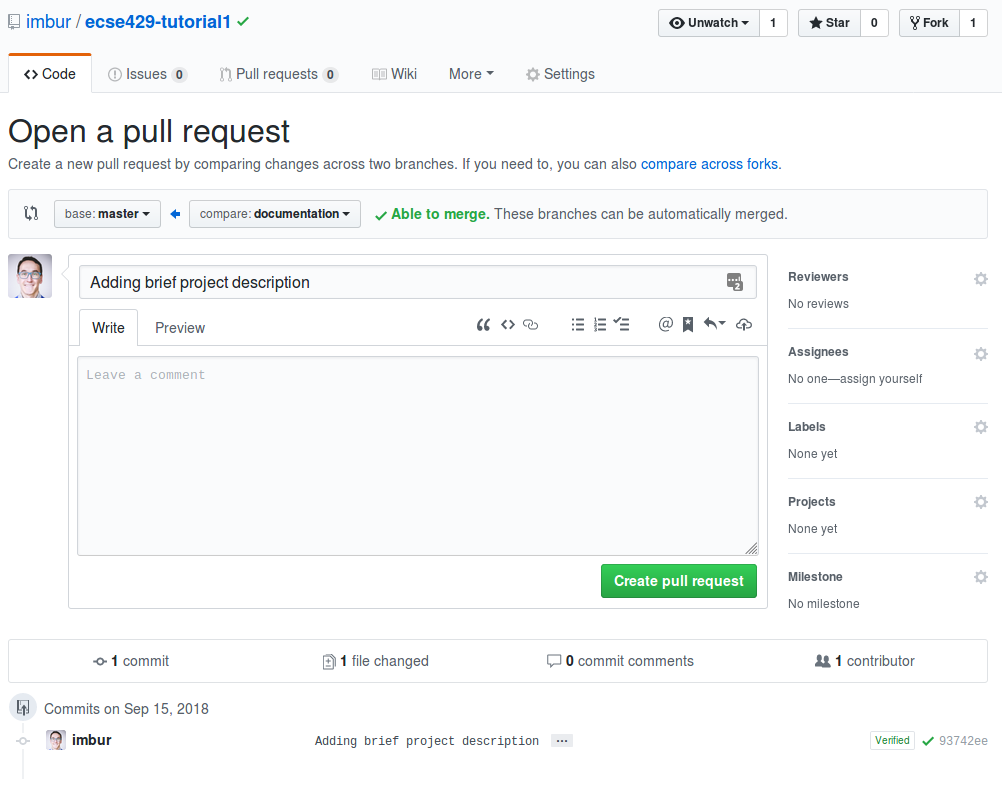
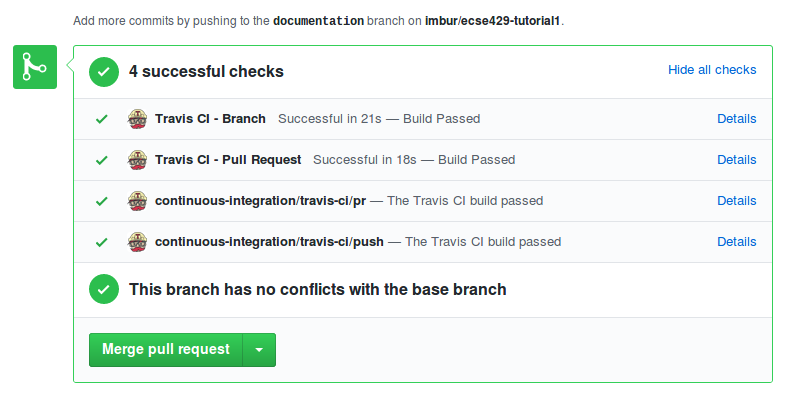
Open the main page for the repository on Github. Click on the green button in the upper right corner to open a pull request.
-
Study the possible settings, then create the pull request.
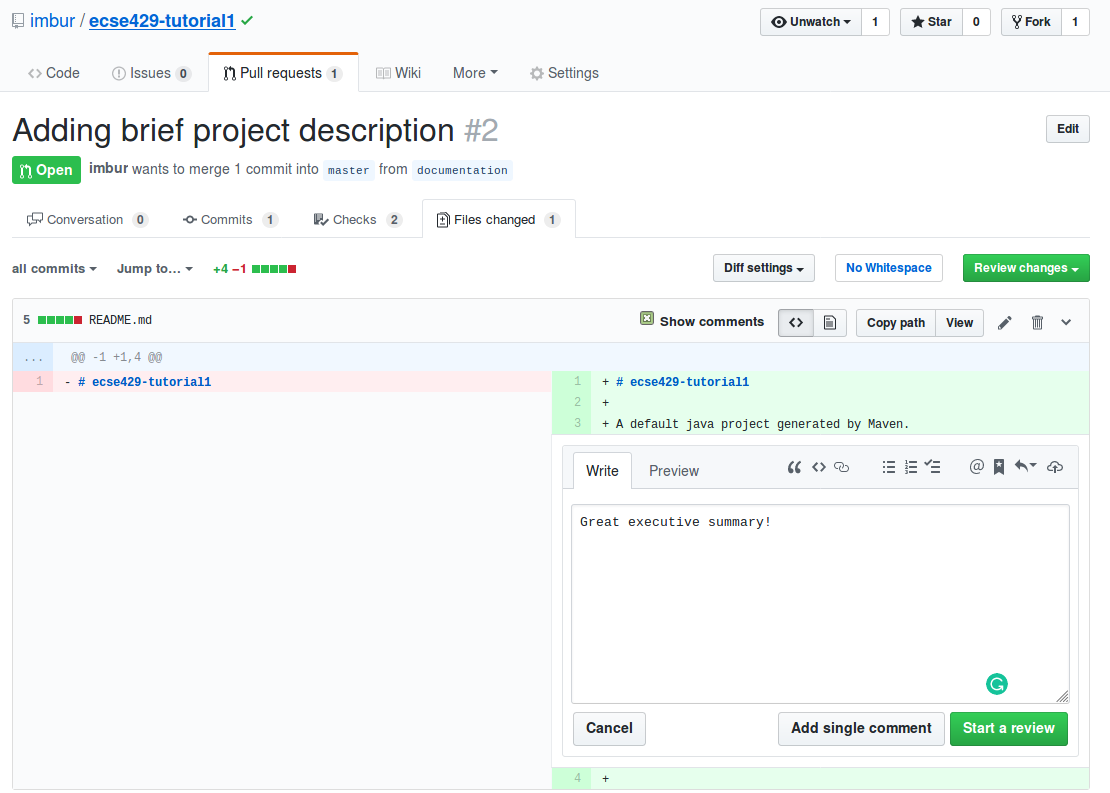
-
On the next page, click on Files changed. Place a comment in the updated file and start a review.
-
Normally, the owner and the reviewer are two different participants, and GitHub offers more options when completing a review: approve changes or request changes. This time simply click on Finish review and Comment.
-
Merge the pull request. Delete the branch afterwards.
5.2. Testing Techniques
QA Engineer walks into a bar. Orders a beer. Orders 0 beers. Orders 999999999 beers. Orders a lizard. Orders -1 beers. Orders a sfdeljknesv.
5.2.1. Specification Based Testing
Specification based testing is also known as black-box testing. Two common techniques are Equivalence Partitioning and Boundary Value Analysis.
Apply both techniques named above to design tests the following function that calculates taxes.
The first 10,000$ of taxable income is tax-free. The next 26,000 CAD$ is taxed at 12%. The following 54,000$ is taxed at 25%. Any further amount s taxed at 40%. There might be additional deductions made to the tax (e.g., based on family status). The function signature is as follows:
public static int calculateTaxes(int income, int taxDeductions);5.2.2. Structure Based Testing
Structure based testing is also known as white-box testing. Some of such testing techniques rely on coverage metrics: statement coverage, branch coverage, condition coverage and MC/DC coverage.
Provide test cases to achieve 100% Condition Coverage for the method below:
public static int sumNaiveGauss (int N) {
    int sum = 0;
    if ( N<=0 )
        return 0;
    while ( N>0 ) {
        sum =sum + N;
        N = N-1;
    }
    return sum;
}